MQTT Connection Guide
WIZ5xxSR-RP MQTT Connection Overview
WIZ5xxSR-RP supports MQTT client and MQTTS client mode.
Required Hardware and Software
Hardware
- WIZ5xxSR-RP
- WIZ5xxSR-RP Evaluation Board (WIZ510SR-RP can be used without WIZ5xxSR-RP Evaluation Board.)
- 5V Power adapter
- Cables (Ethernet / Serial)
Software
- WIZnet S2E Configuration Tool
- Mosquitto:
How to Connect to MQTT Broker through Mosquitto
WIZ5xxSR-RP supports MQTT client and MQTTS client mode, but this section guides how to connect to MQTT broker through Mosquitto based on MQTT client mode.
Note : MQTTS client mode requires additional security-related settings, unlike MQTT client mode.
Step 1: Setup Environment to Use WIZ5xxSR-RP
The process of setup environment to use the WIZ5xxSR-RP each product is available at the 'Getting Started' document below.
Step 2: Setup Mosquitto
Depending on the Mosquitto version, you may need to setup Mosquitto, so refer to the below to setup.
- In Mosquitto versions earlier than 2.0 the default is to allow clients to connect without authentication.
- In 2.0 and up, you must choose your authentication options explicitly before clients can connect.
Therefore, if you are using version 2.0 or later, refer to following link to setup 'mosquitto.conf' in the directory where Mosquitto is installed.
Step 3: Run MQTT Broker through Mosquitto
Ex>
mosquitto -c mosquitto.conf -p 1883 -v
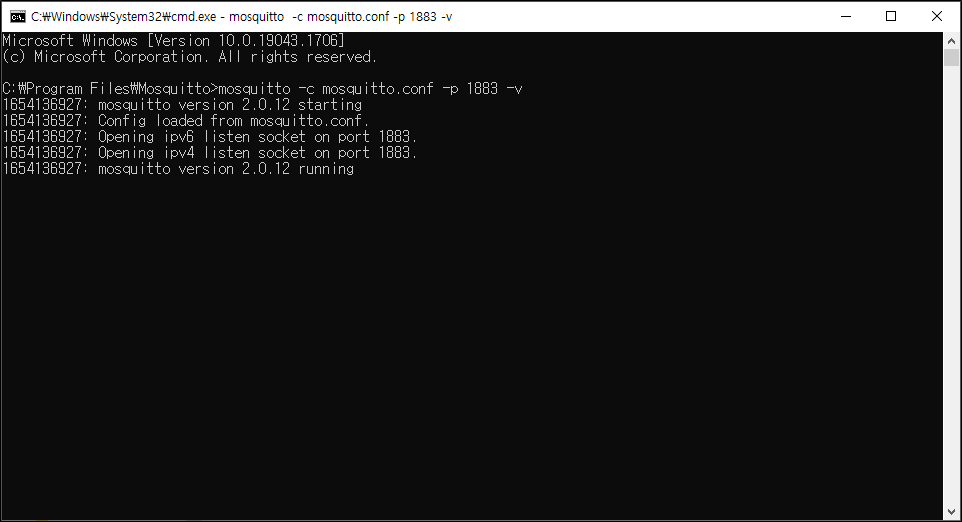 |
| Figure: Run MQTT broker through Mosquitto |
Step 4: Setup WIZ5xxSR-RP through WIZnet S2E Configuration Tool for MQTT Broker Connection
- Select MQTT client mode in the Operation mode setting section
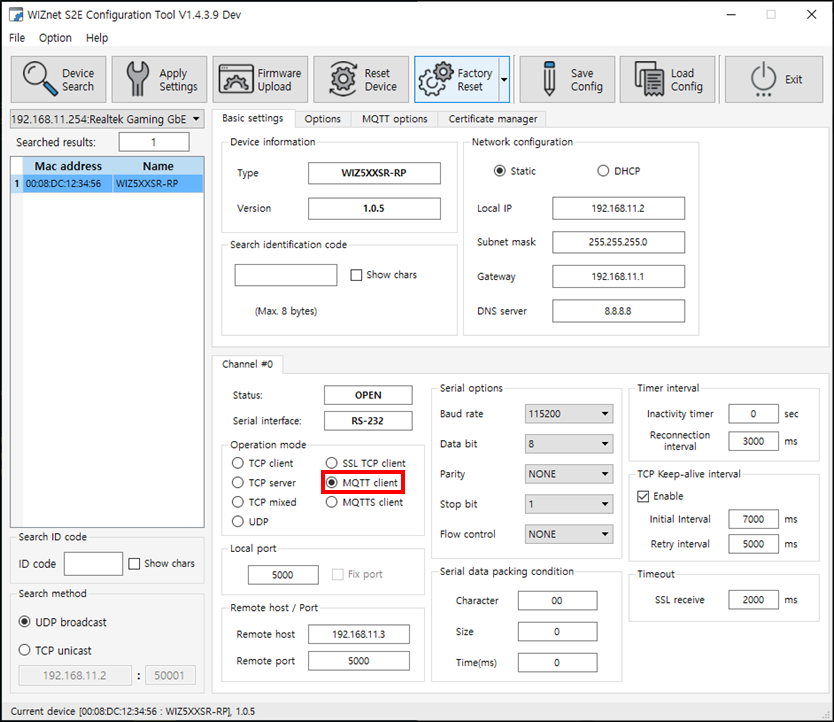 |
| Figure: Select MQTT client mode |
- Setup the remote host IP (or URL) and remote port in the Remote host / port section
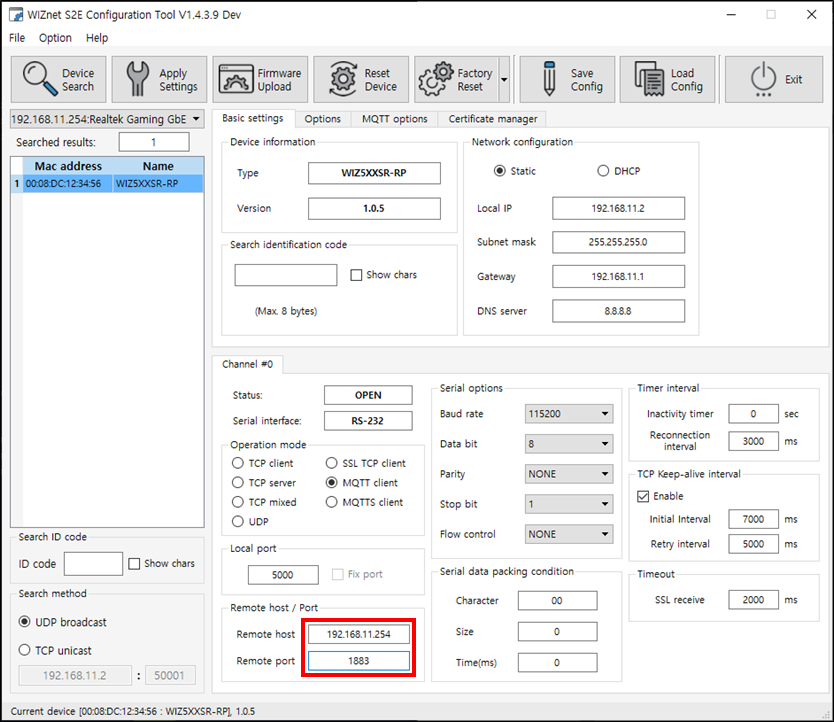 |
| Figure: Setup remote host IP and remote port |
- Setup MQTT options
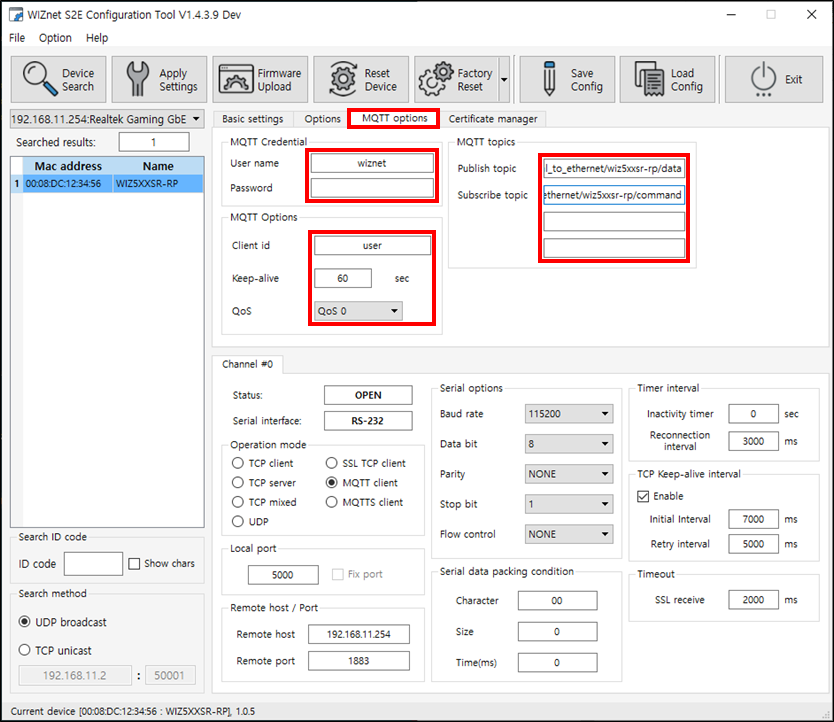 |
| Figure: Setup MQTT options |
- Click the Apply Settings button to save the settings
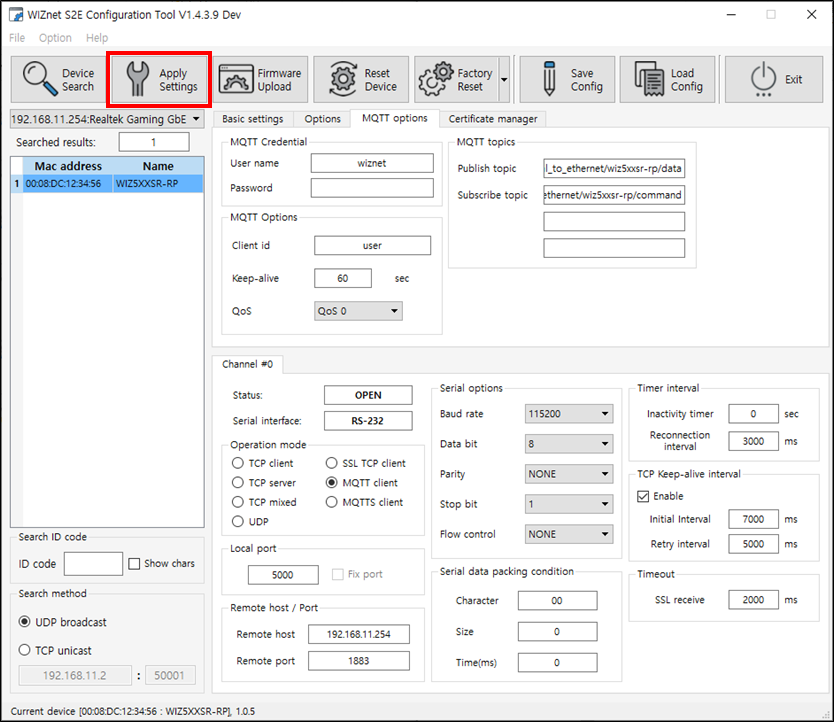 |
| Figure: Click Apply Settings button |
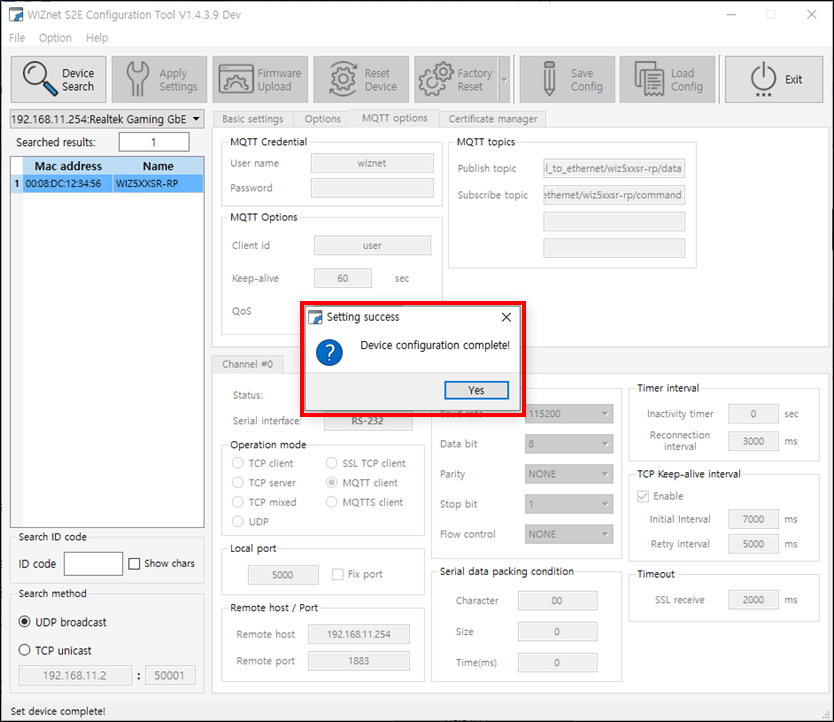 |
| Figure: Saved settings |
Step 5: Done
WIZ5xxSR-RP is successfully connected to the MQTT broker!
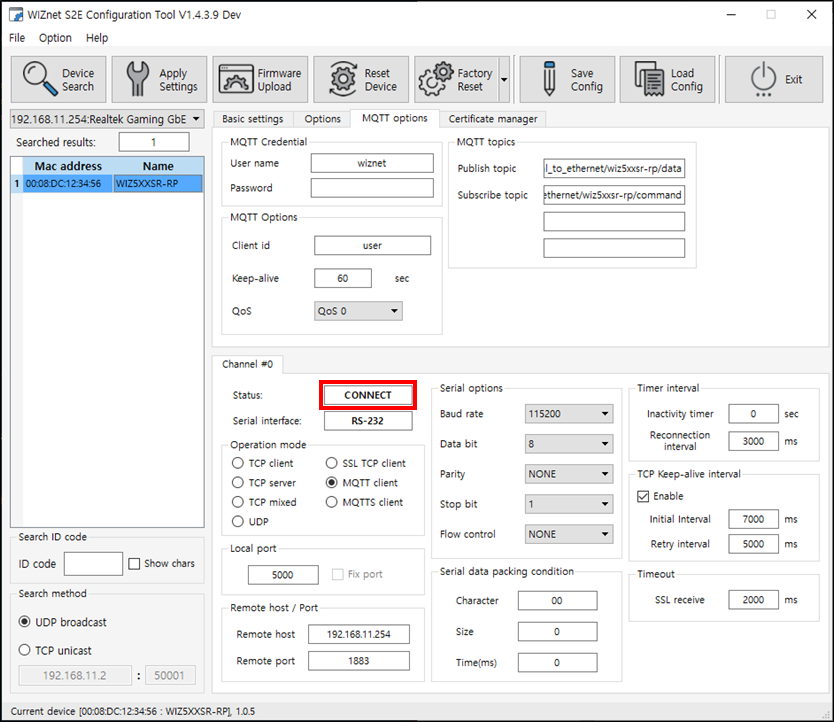 |
| Figure: Status |
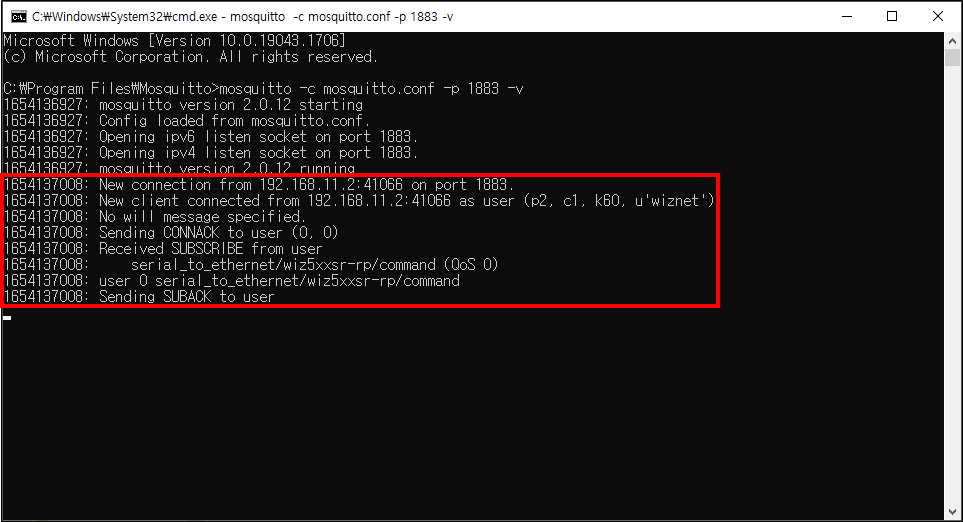 |
| Figure: Connect to MQTT broker |
How to connect using MQTT with AWS
Step 1: Creating a Thing and Policy in AWS and downloading the certificate
- To use AWS services, you must first log in. Please click the link below to proceed to the login page.
- After logging in, search for "IoT console" in the search bar and click on it.
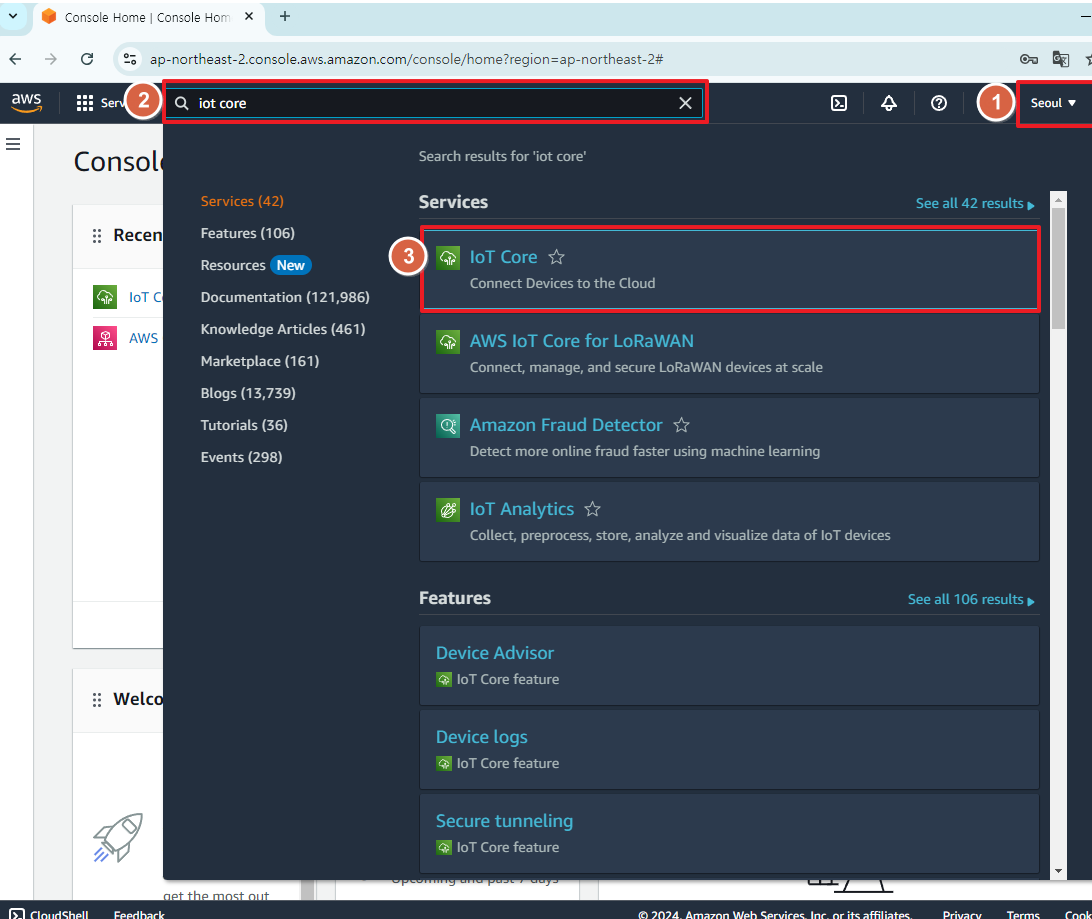 |
| Figure: search for "IoT console" |
- Click on the "Things" tab on the left, and then press the orange "Create things" button.
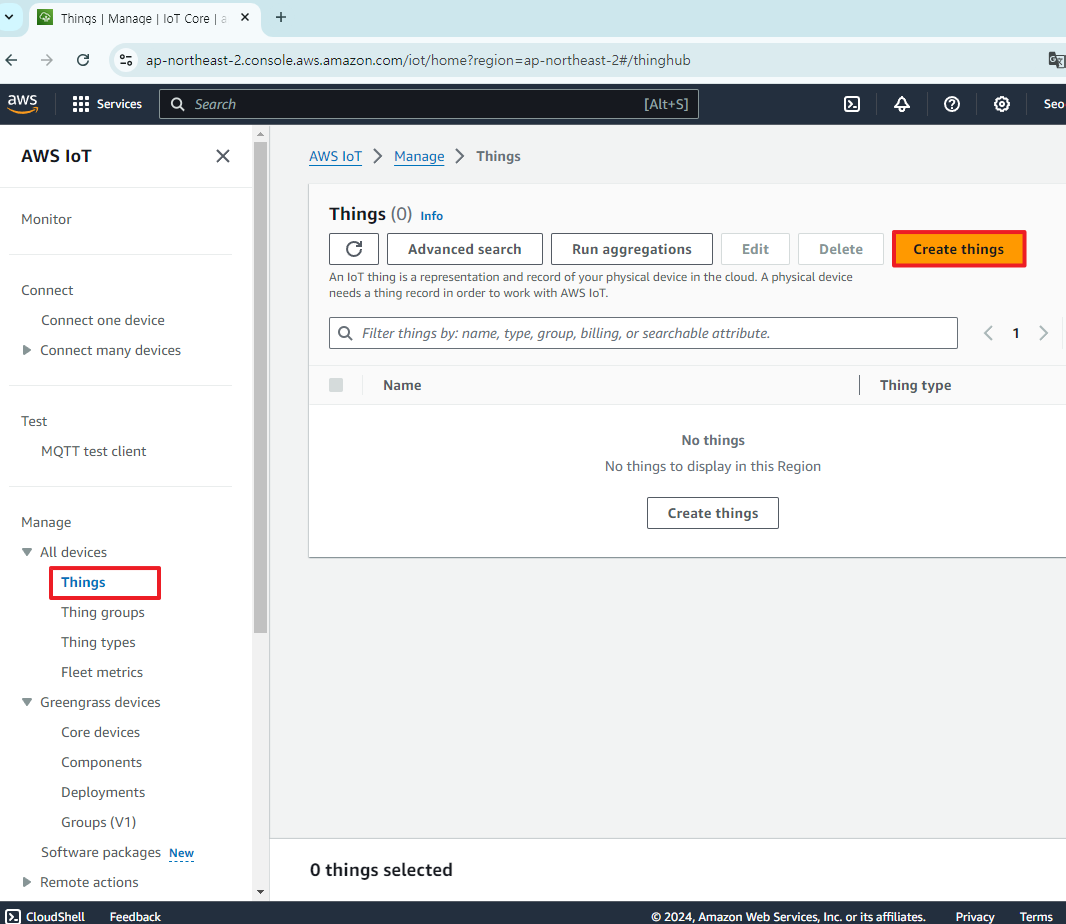 |
| Figure: Click "create Things" |
- Select "Create single thing" and then press the Next button.
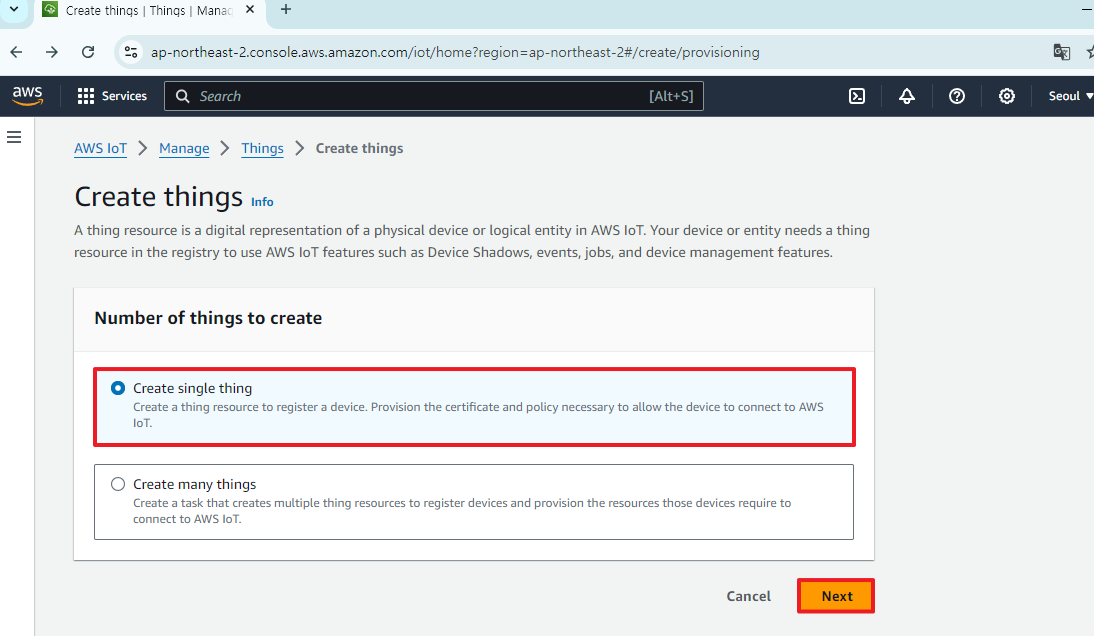 |
| Figure: Select "Create single thing" and Click "Next" |
- Enter the "Thing name" and press the Next button.
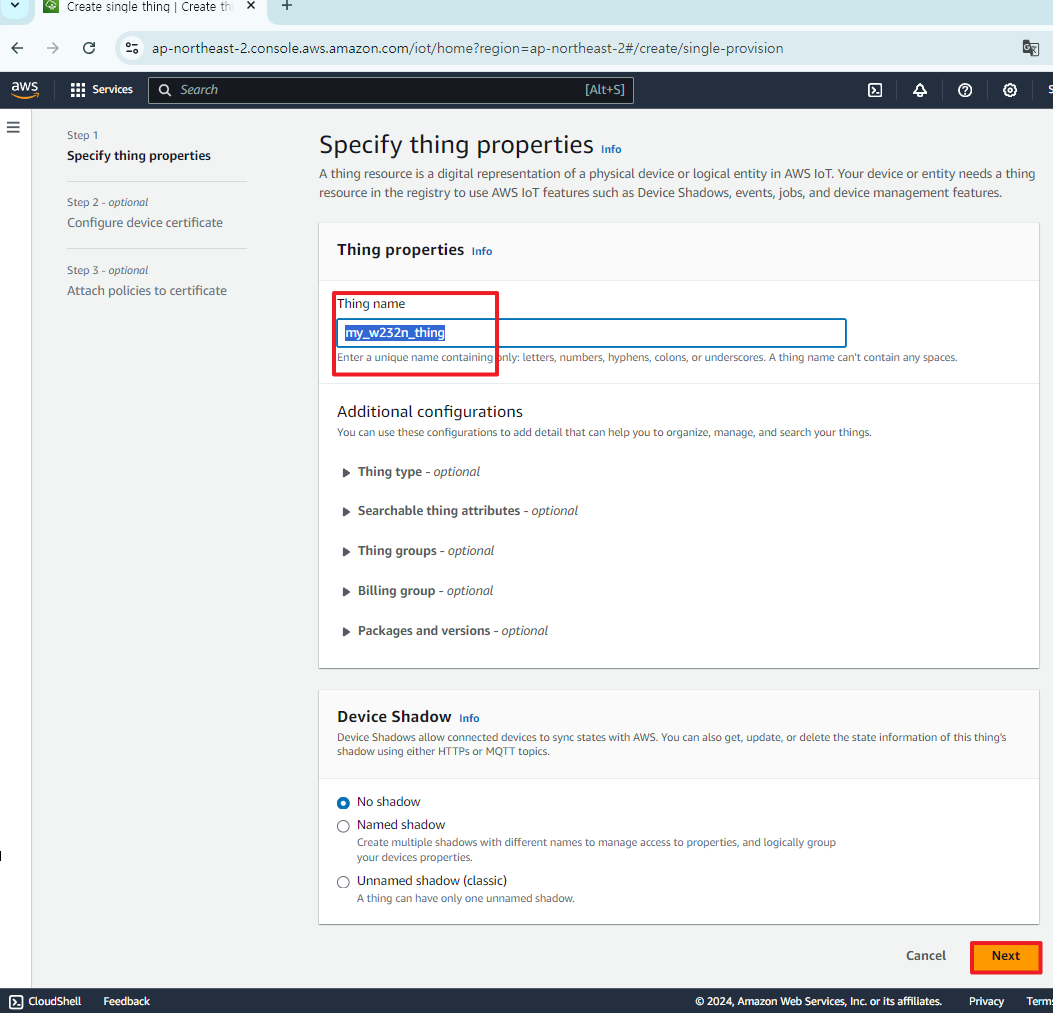 |
| Figure: Enter the "Thing name" |
- Select "Auto-generate a new certificate (recommended)" and press the Next button.
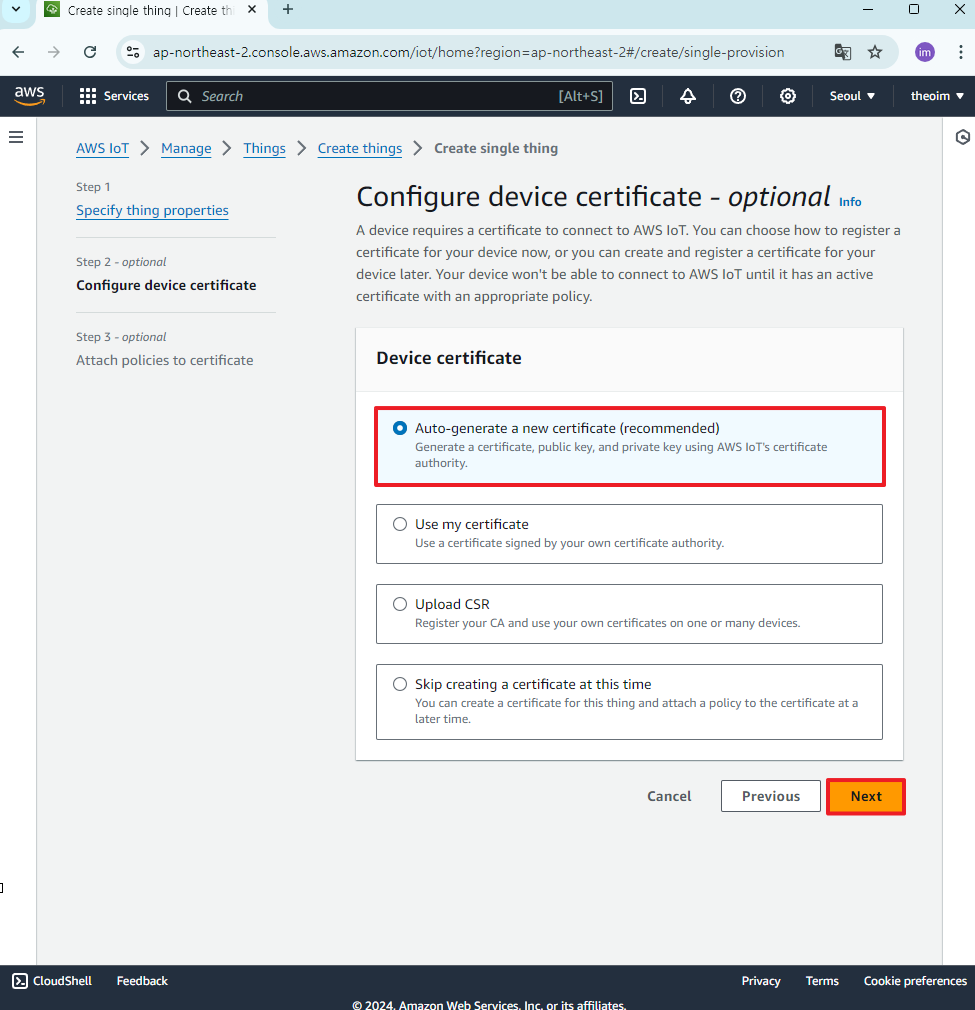 |
| Figure: Select "Auto-generate a new certificate" and Click "Next" |
- Next, you need to create a policy for the security of the thing. Click on "Create policy"
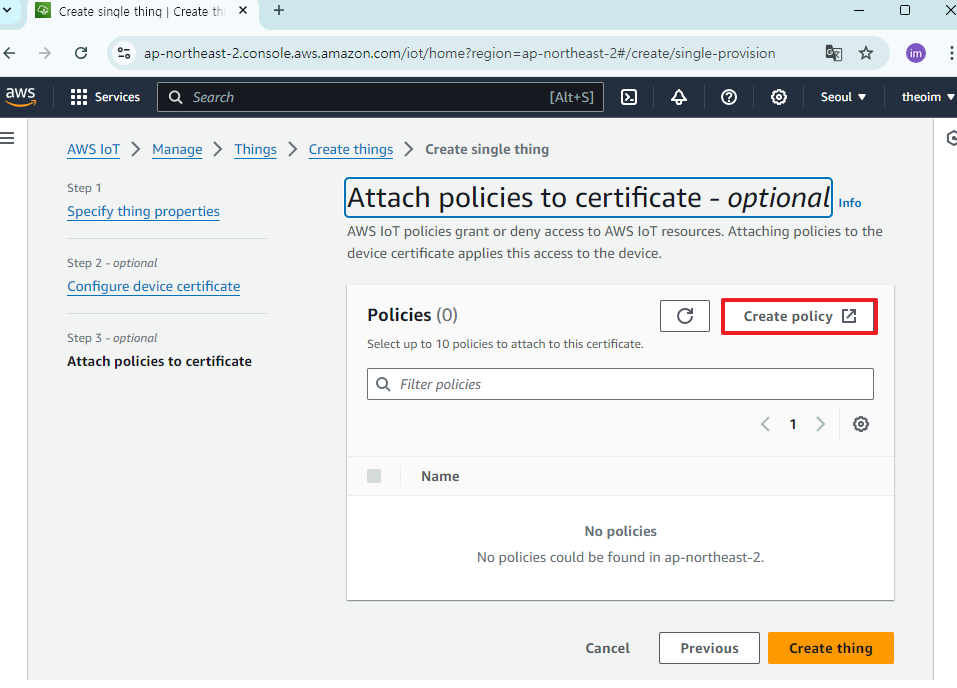 |
| Figure: Click on "Create policy" |
- Set the name of the policy, configure the Policy Document as shown in the picture, and then press the Create button.
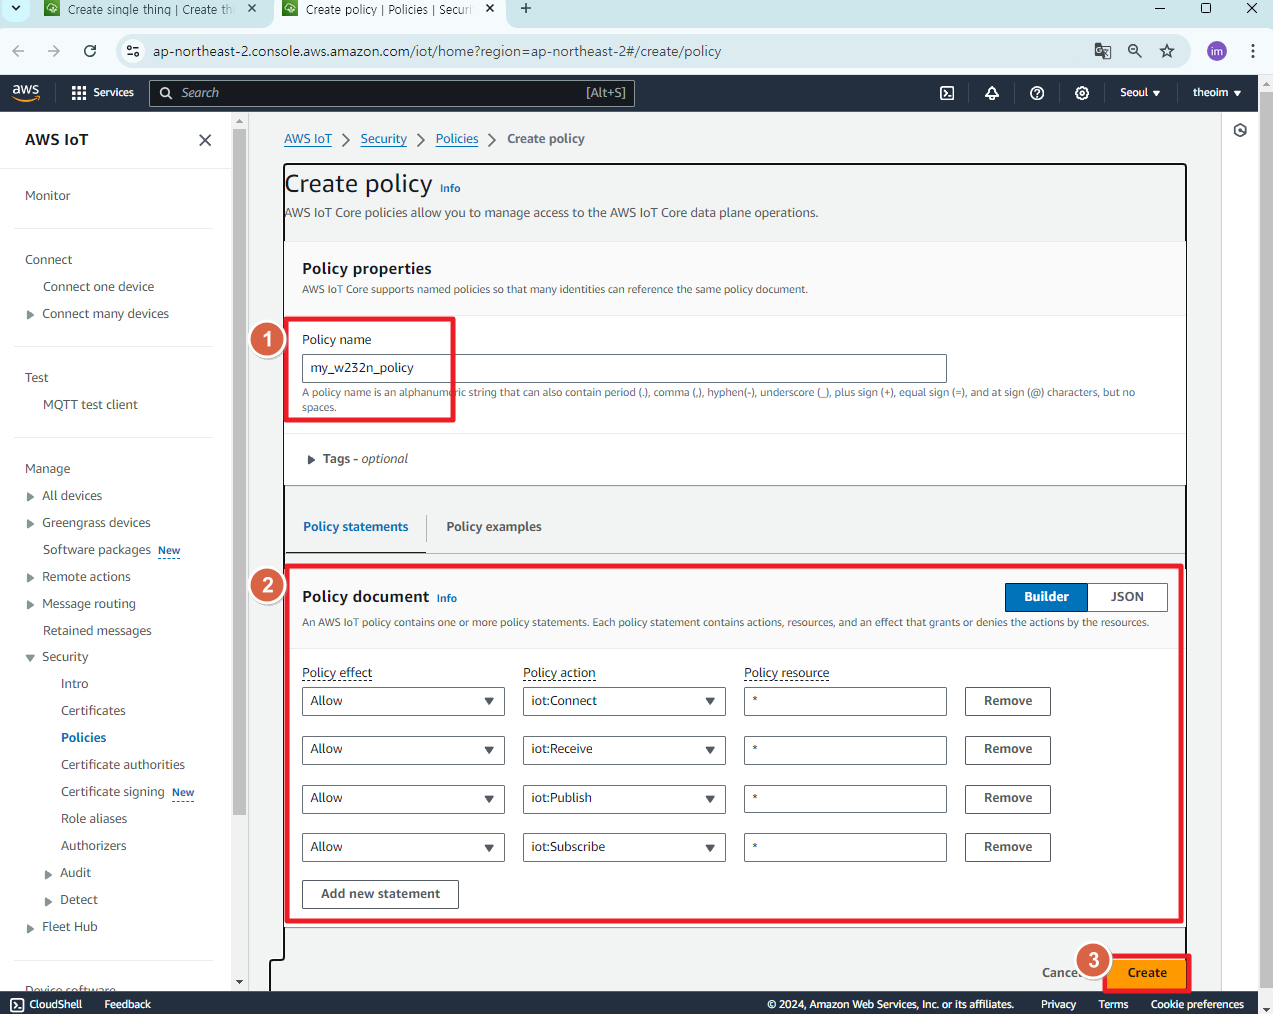 |
| Figure: Setting Policy Information |
- Return to the previously opened "Create single thing" page and press the "Create thing" button.
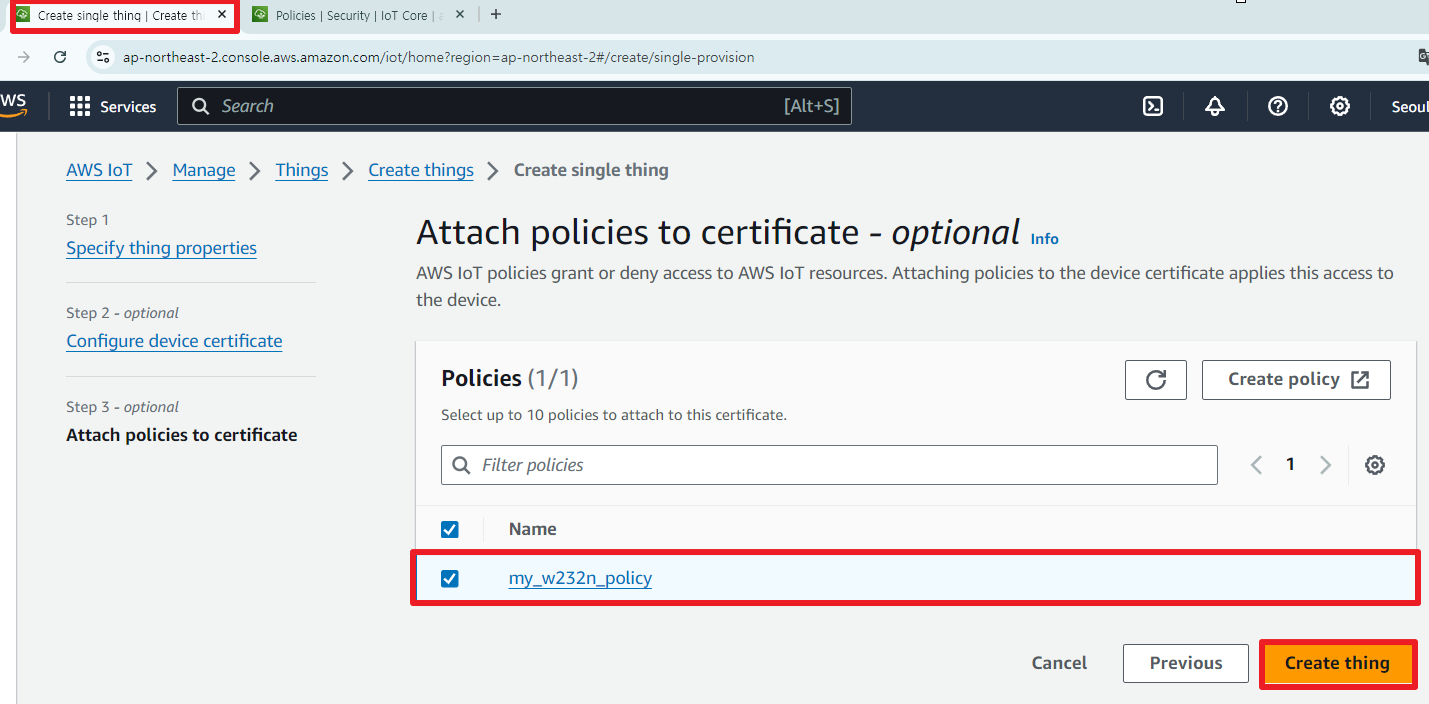 |
| Figure: press the "Create thing" button |
- Download all the Key & certificates.
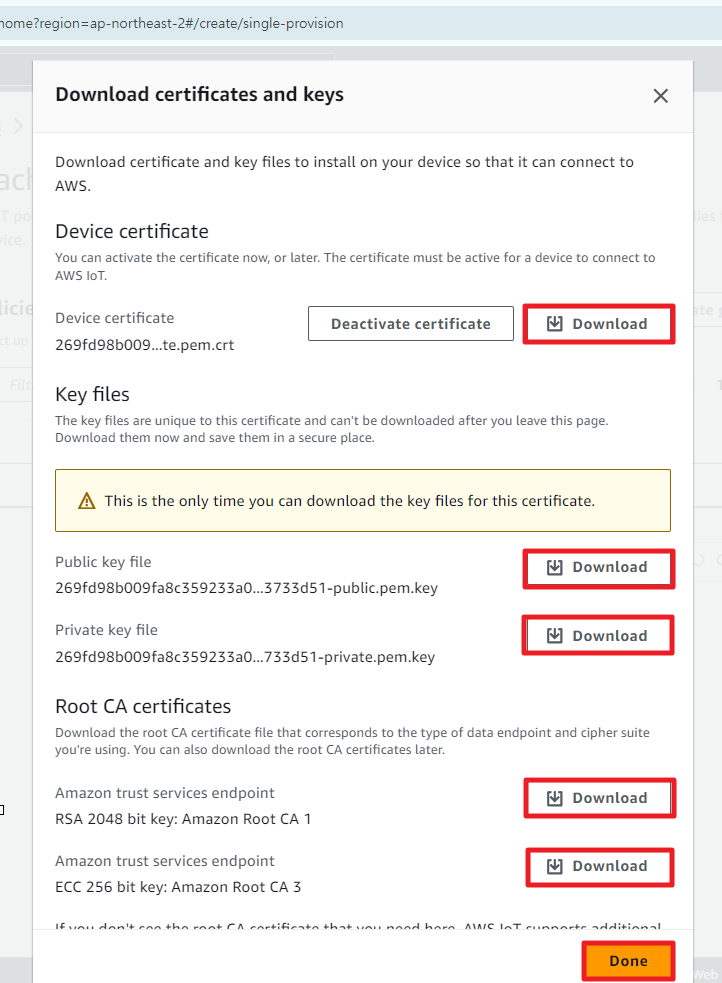 |
| Figure: Downloading all the Key & certificates |
Step 2: Entering the certificate into the S2E module
- Enter the MQTT test client tab in AWS and copy the endpoint.
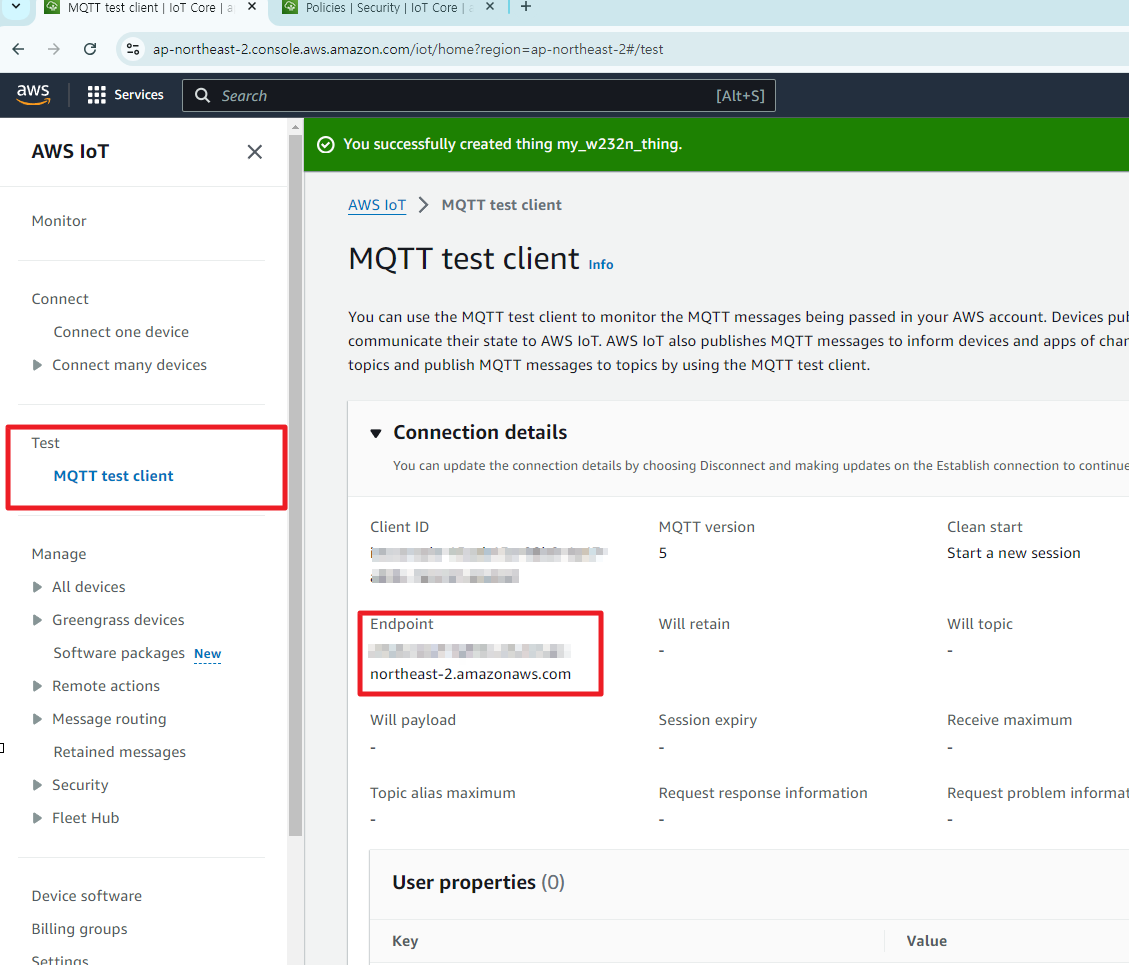 |
| Figure: Copy 'Endpoint'" |
- Turn on the configuration tool, search for the device, and set the "Basic settings" tab as follows.
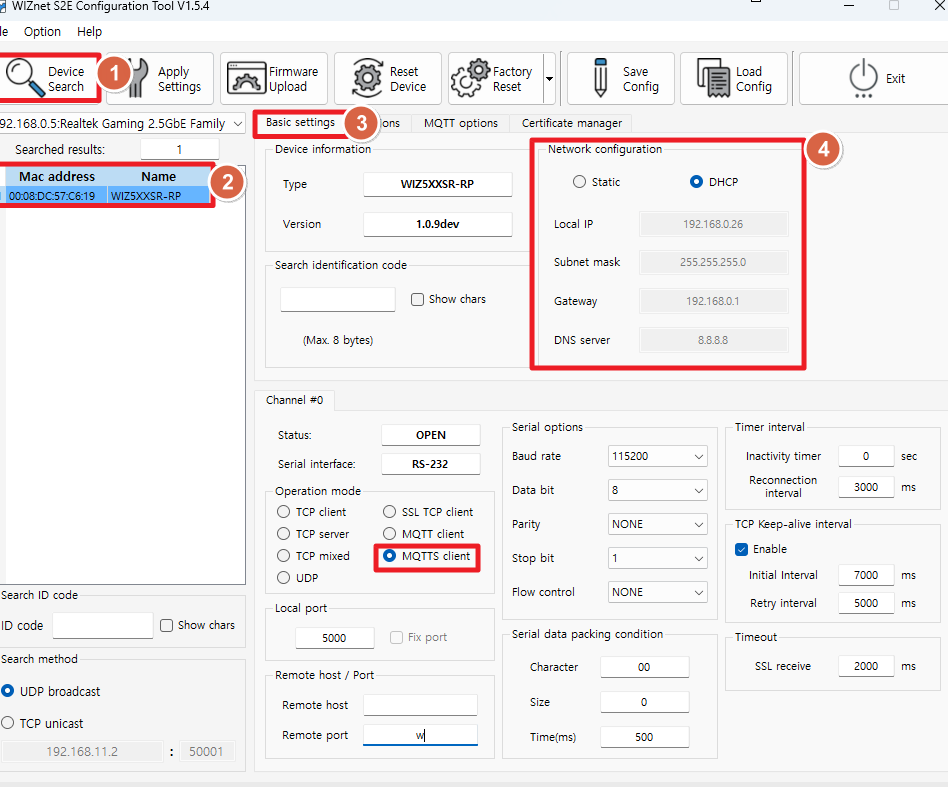 |
| Figure: setting the "Basic settings" tab of configuration tool |
- Set the "MQTT options" tab as follows.
-
MQTT Topics Section
- Publish Topic:
$aws/things/my_w232n_thing/shadow/update - Subscribe Topic:
$aws/things/my_w232n_thing/shadow/update/accepted
- Publish Topic:
-
MQTT Options
- Client ID:
my_w232n_thing - Keep-Alive:
60 - QoS:
QoS 0
- Client ID:
-
Remote Host / Port
- Remote Host:
Paste the endpoint copied earlier - Remote Port:
8883
- Remote Host:
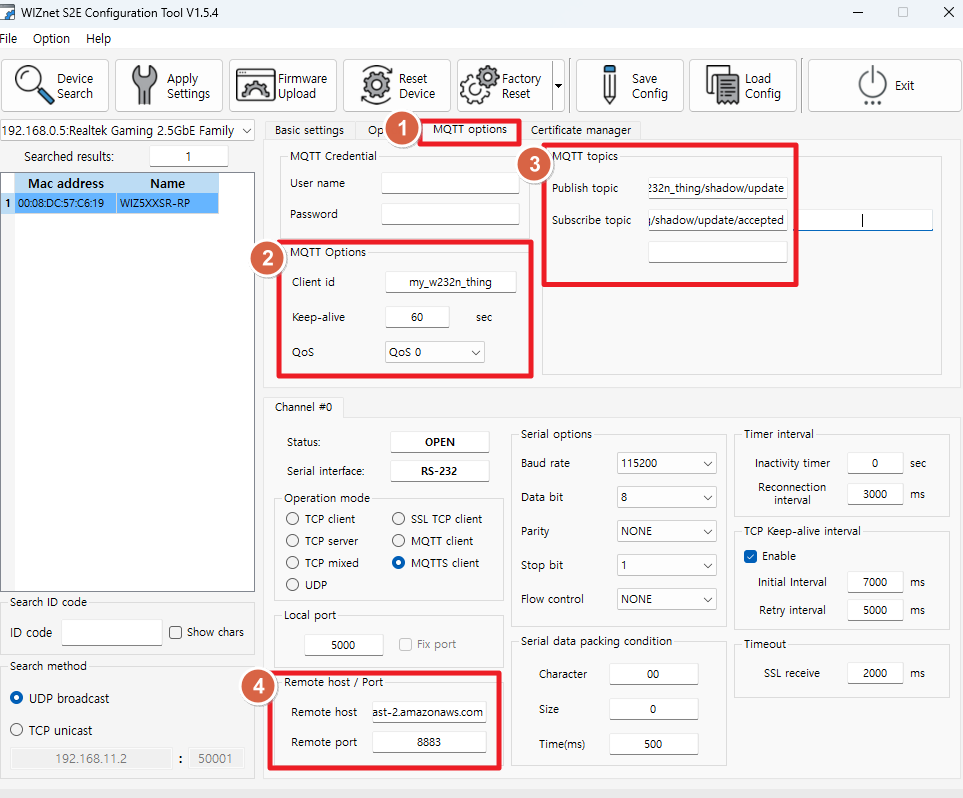 |
| Figure: Setting the "MQTT options" |
- Go to the Certificate Manager tab and adjust the Root CA section to match the settings shown in the picture below.
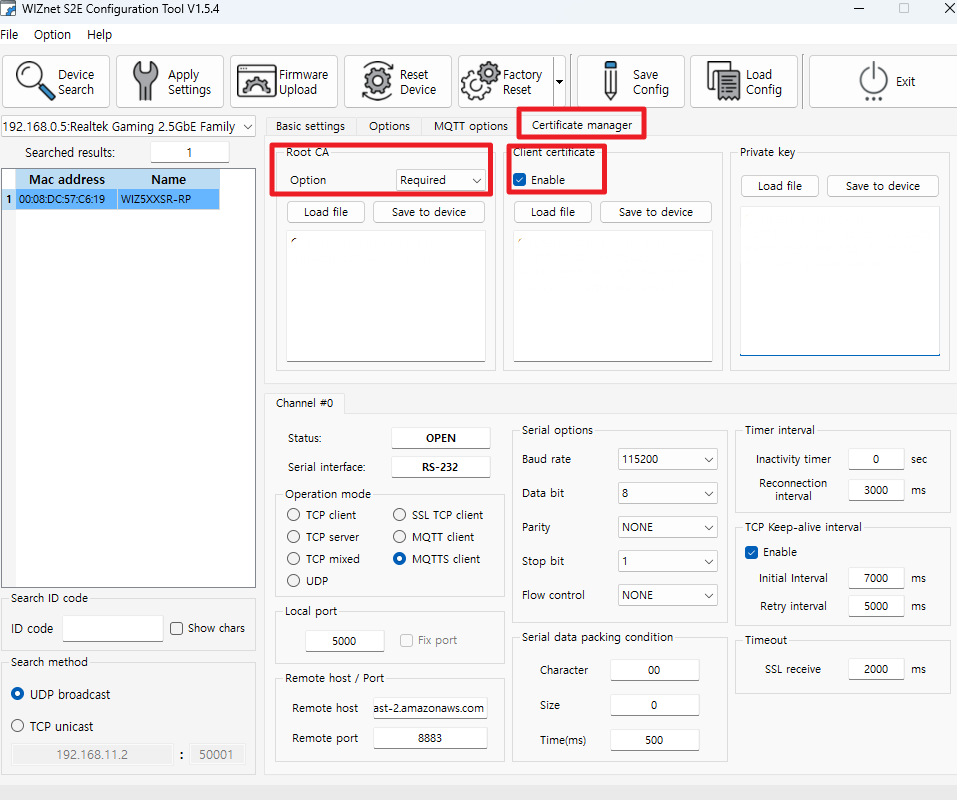 |
| Figure: adjusting the Root CA section |
- Press "Load file" to load the following certificate and key files:
- Root CA : AmazonRootCA1.pem
- Client Certificate : xxxxx-certificate.pem.crt
- Private Key : xxxxx-private.pem.key
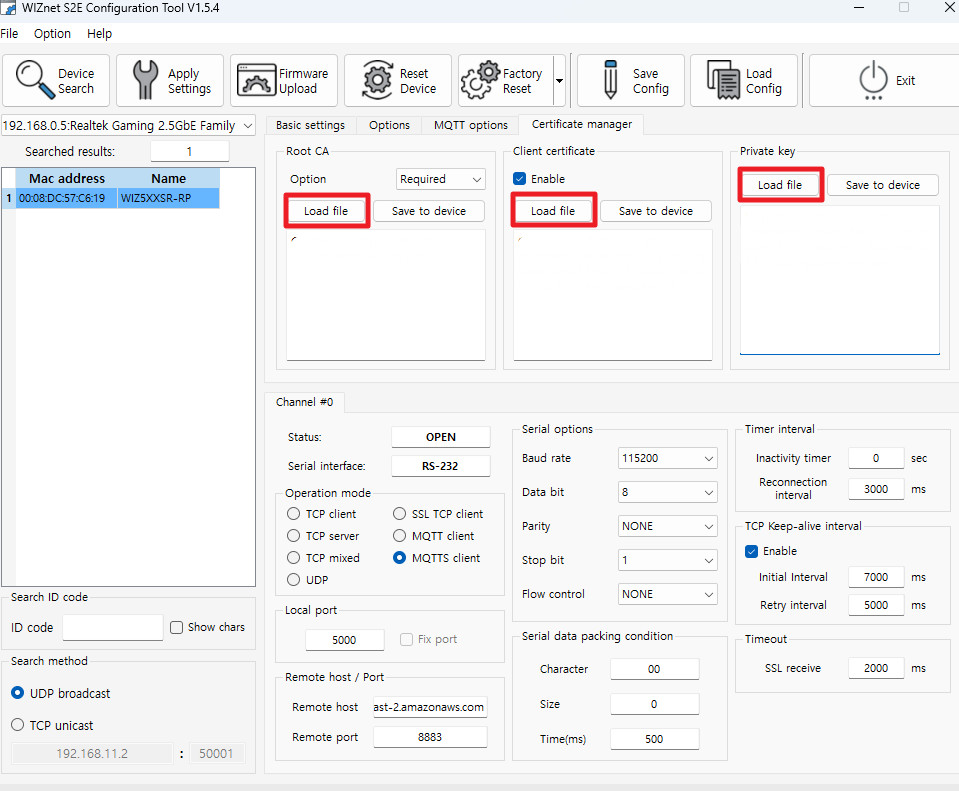 |
| Figure: Load certificate and key files |
- Press the "Save to device" button three times.
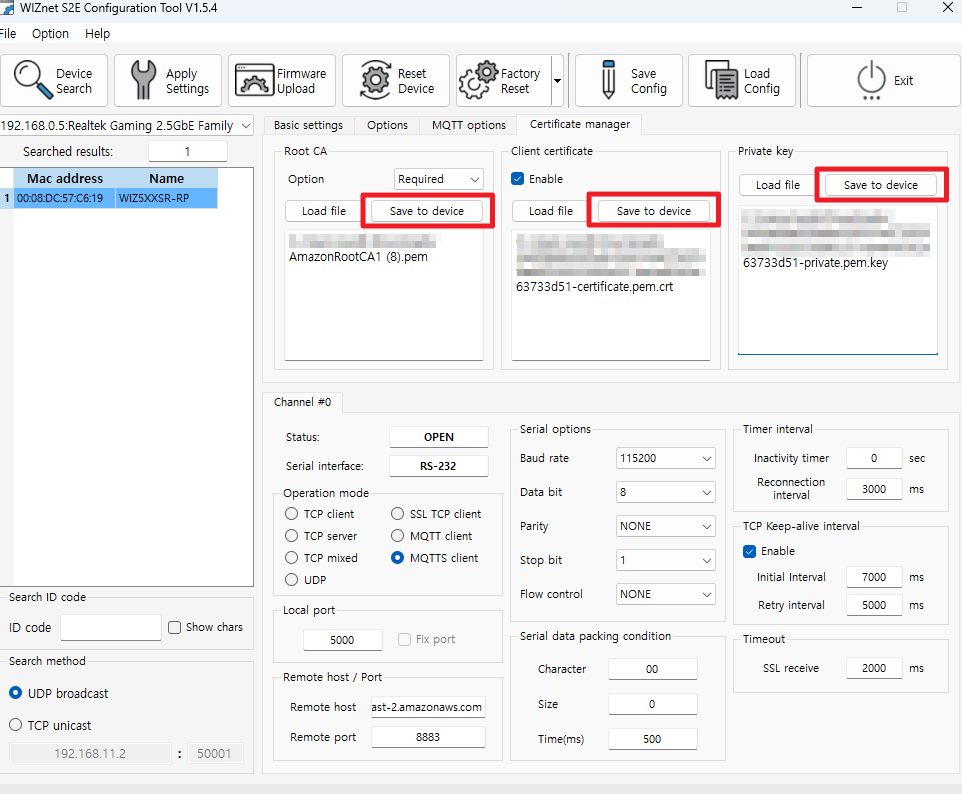 |
| Figure: Save certificate and key files |
- Press "Apply settings"
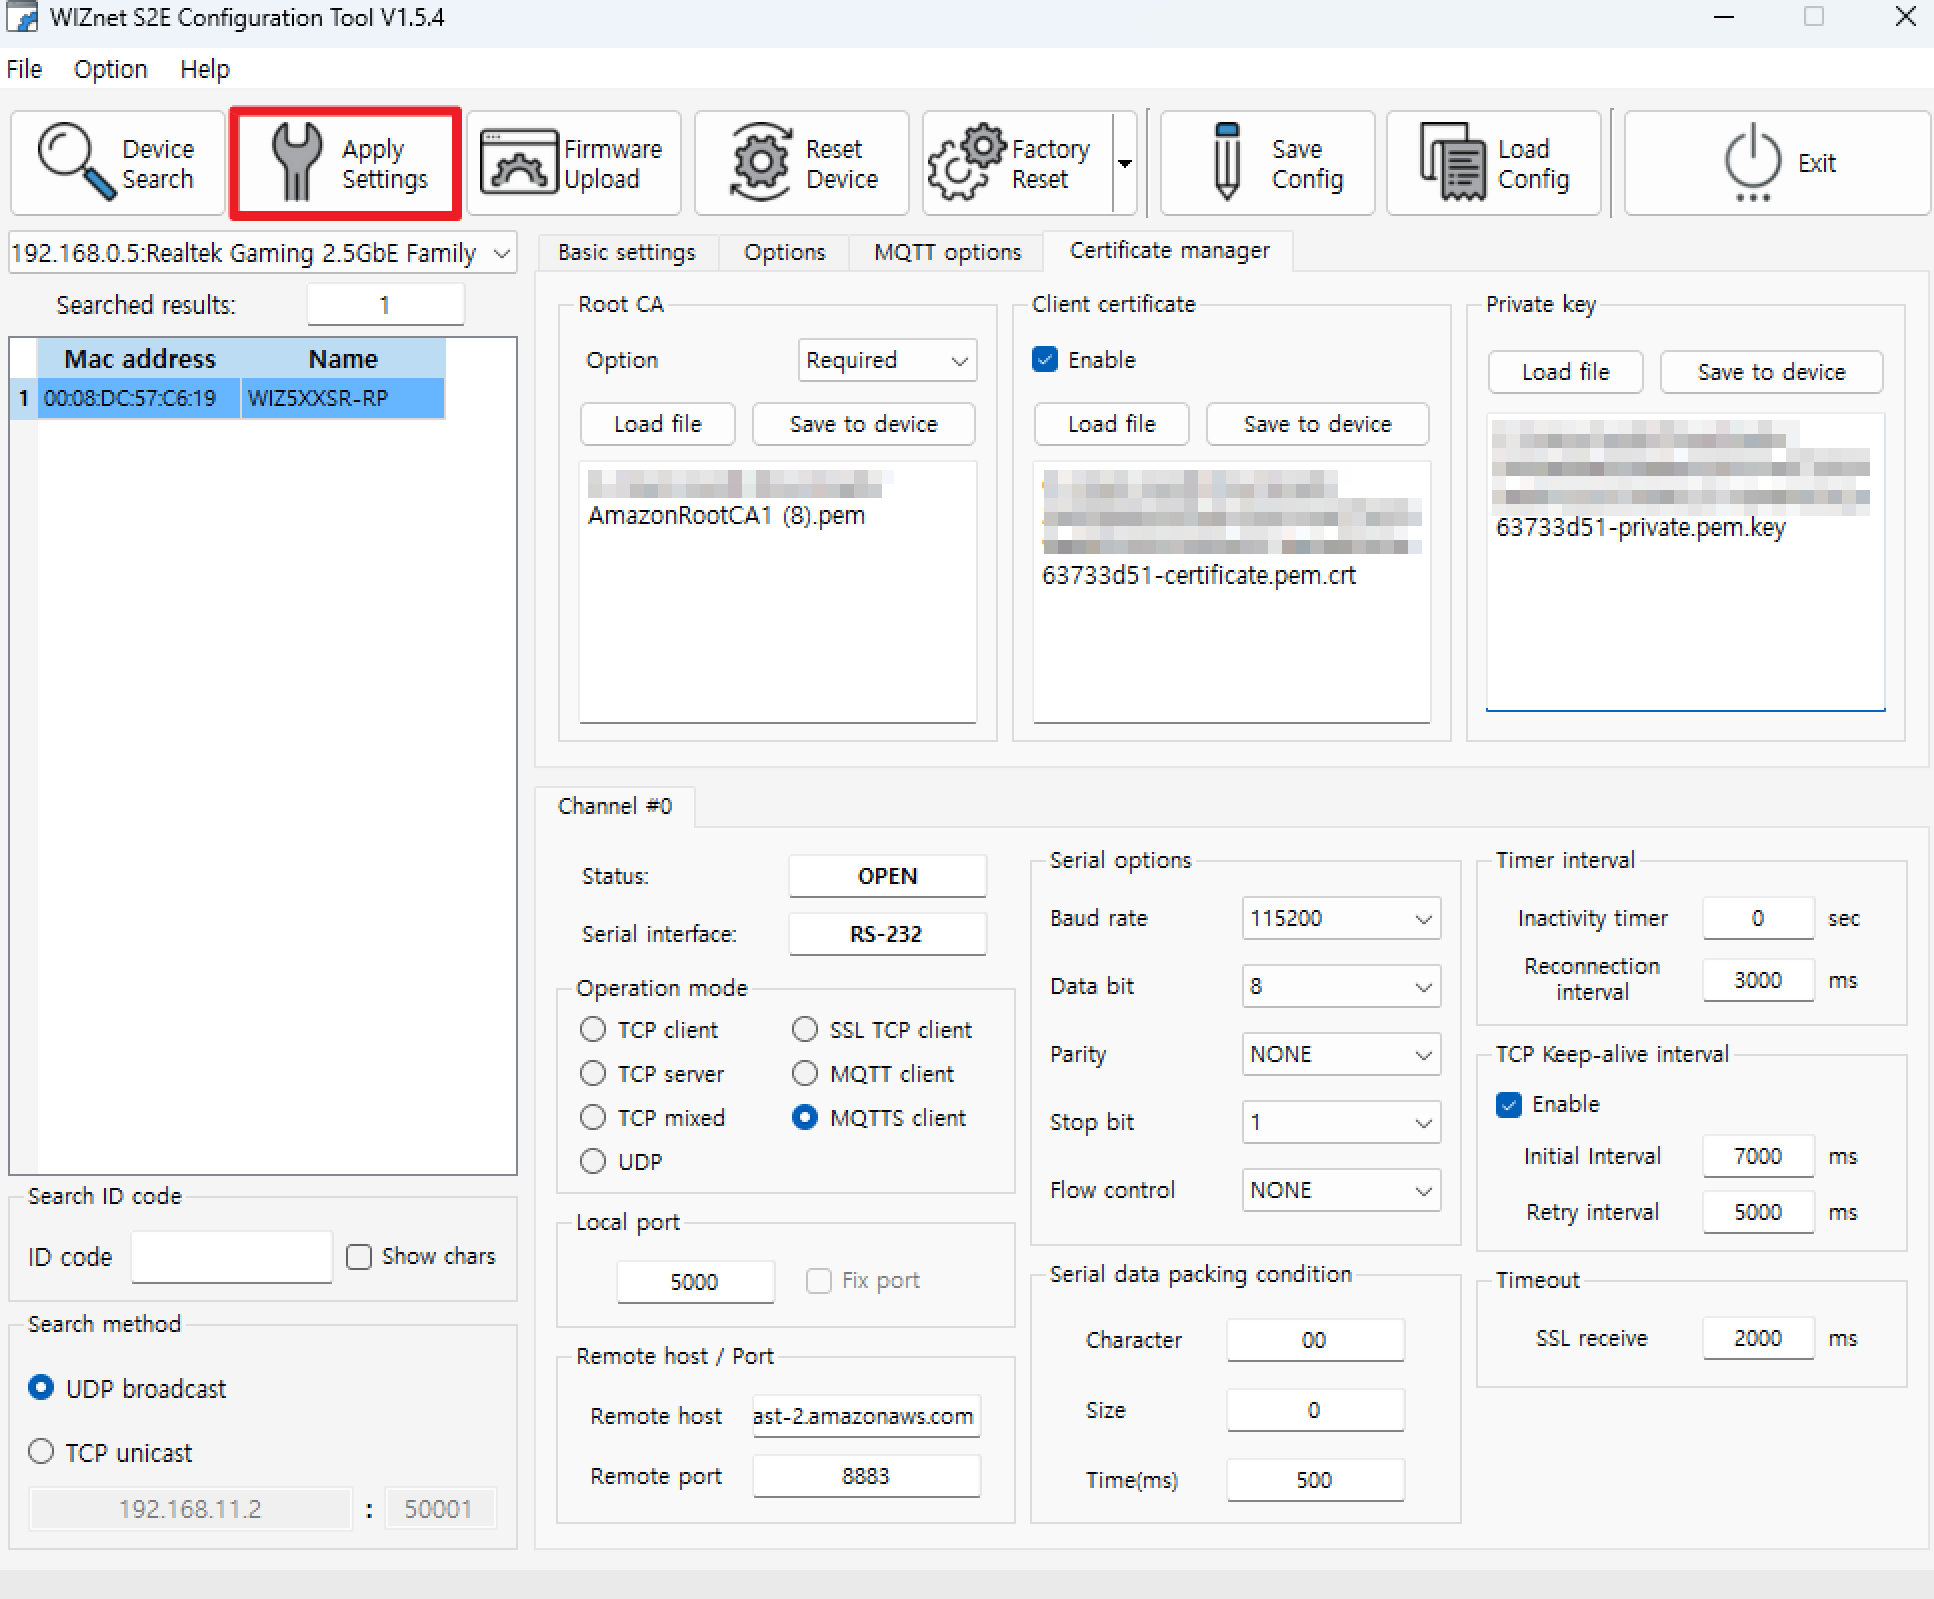 |
| Figure: Press "Apply settings" |
Step 3: execute (Subscribe)
- Return to the AWS IoT console page and click on "MQTT test client" under the "Test" section to enter. Then, enter the Publish Topic $aws/things/my_w232n_thing/shadow/update from the MQTT Topics Section in the Configuration Tool into the "Topic filter". Press the Subscribe button.
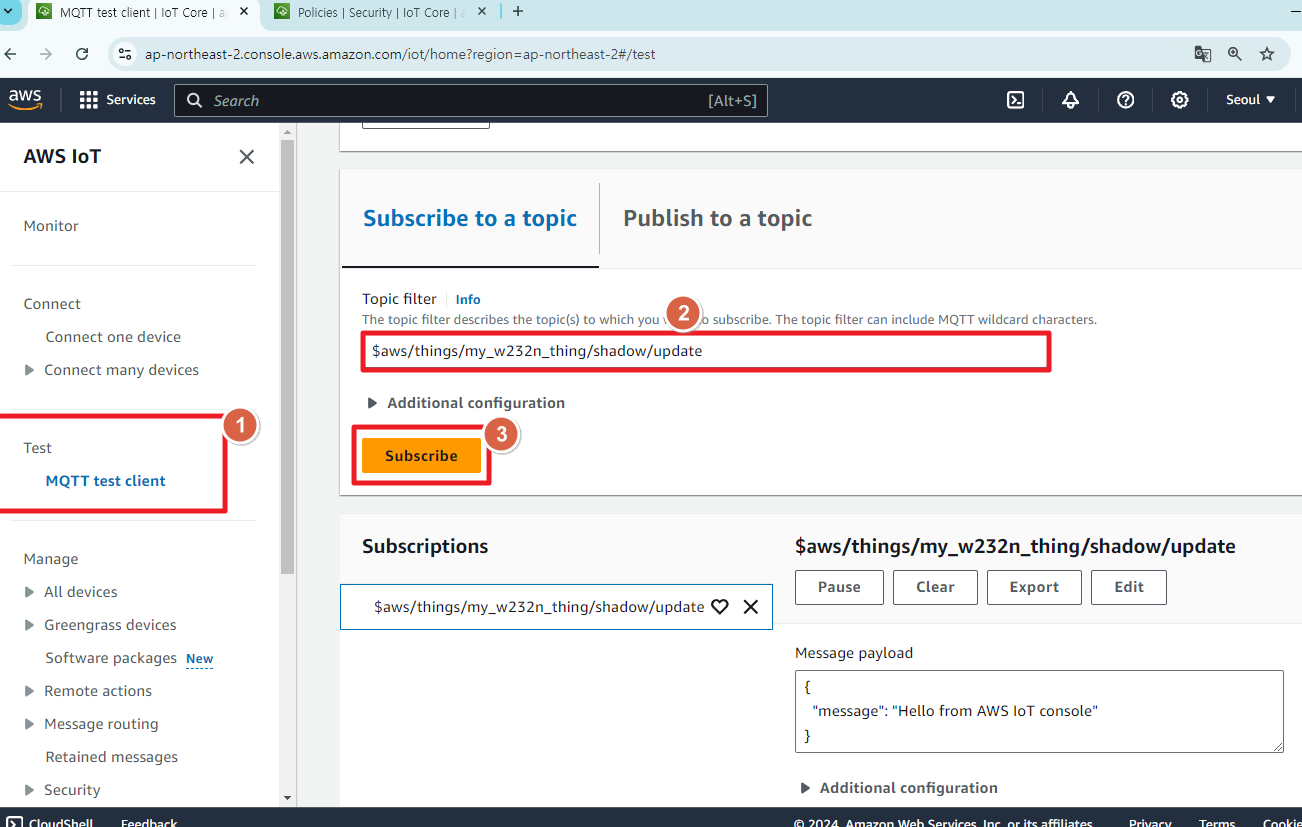 |
| Figure: Subscribe to a topic |
- Open the USB port connected to the S2E module's UART using a serial terminal tool, and send the data.
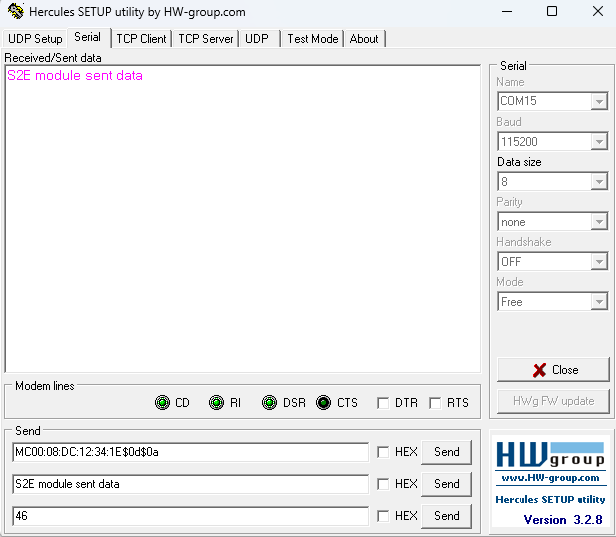 |
| Figure: Sending data |
- This way, you can confirm that the MQTT communication is working correctly with AWS.
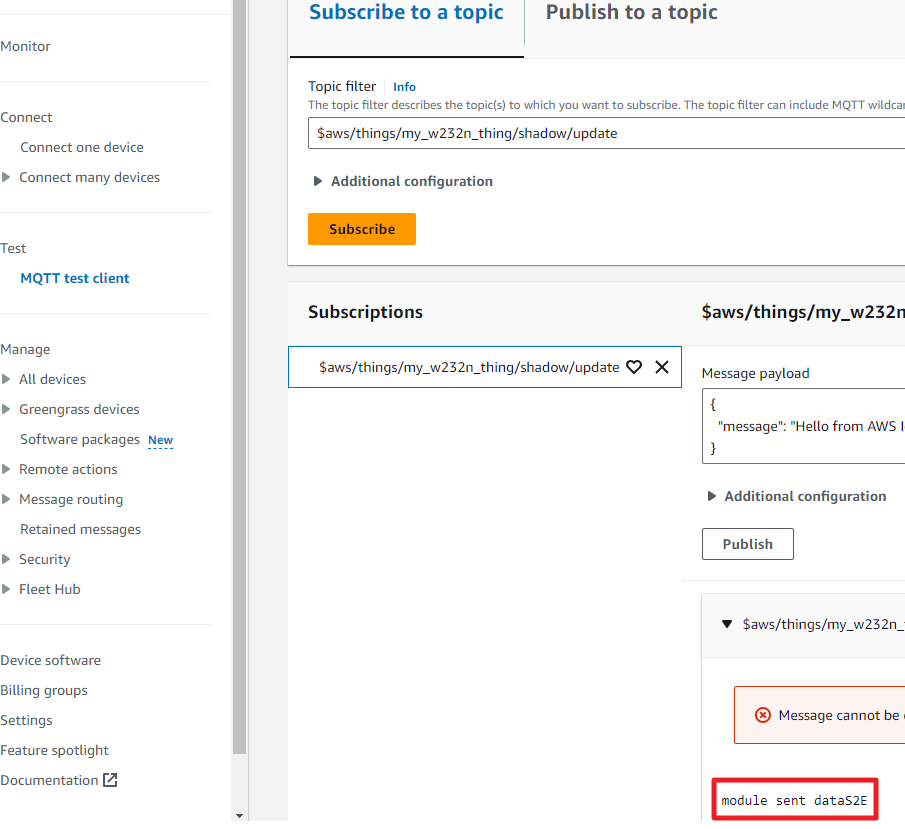 |
| Figure: sucessful MQTT communication with AWS |
Step 4: execute (Publish)
- Return to the AWS IoT console page and click on "MQTT test client" under the "Test" section. Then, enter the Subscribe Topic $aws/things/my_w232n_thing/shadow/update/accepted from the MQTT Topics Section in the Configuration Tool into the "Topic name". Press the Publish button.
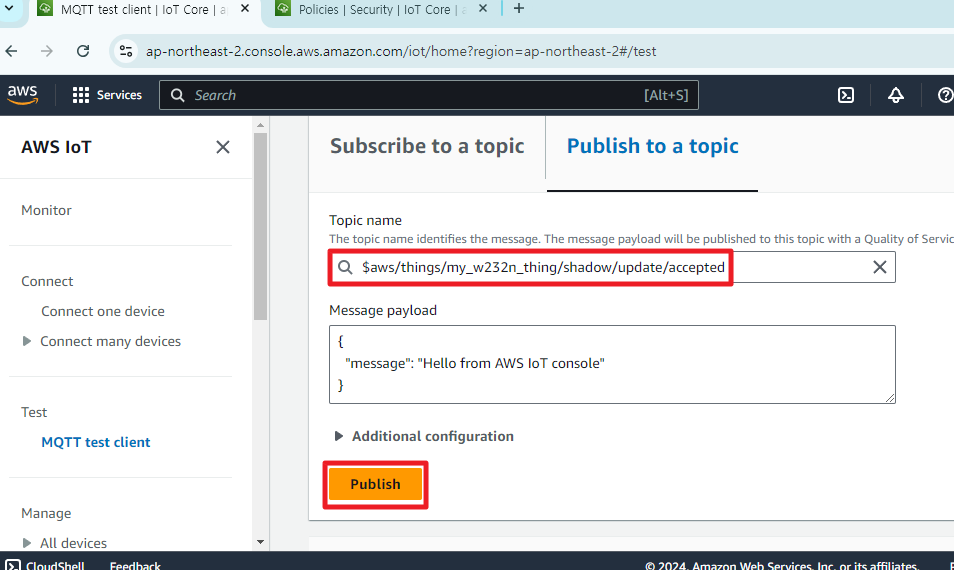 |
| Figure: Publish to a topic |
- You can verify the data sent from AWS in the serial window.
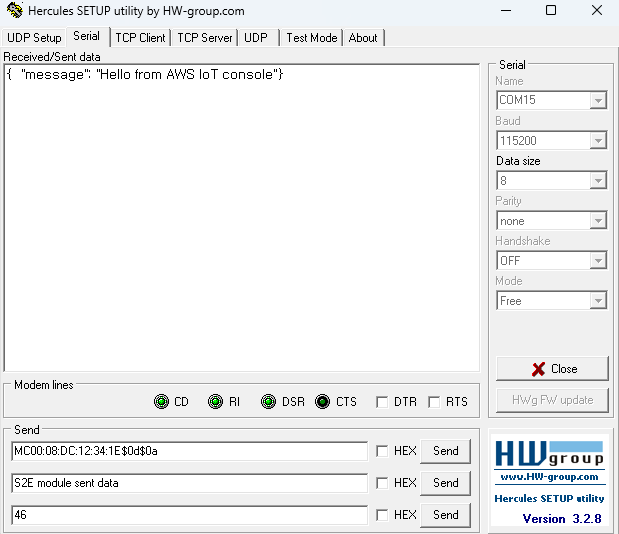 |
| Figure: sucessful MQTT communication with AWS |