Getting Started [EN]
This document was created based on usage using WIZ550SR-EVB.
Unpacking the WIZ550SR EVB

WIZ550SR-EVB package is made up of the following components.
- WIZ550SR - 1EA
- WIZ550SR-EVB - 1EA
- Cat5, Ethernet Cable - 1EA
- Micro USB B Type Cable - 1EA
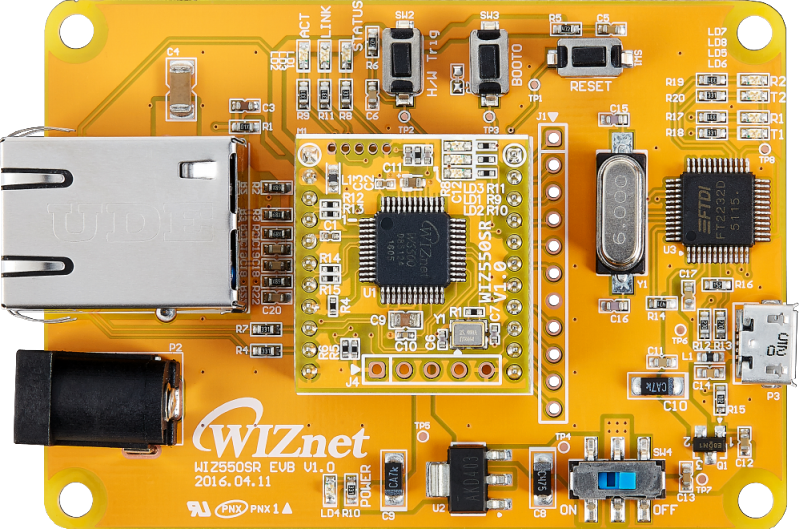
Make sure that the WIZ550SR are assembled as shown above.
Prerequisites for Setup
Software
- Virtual COM Port USB Driver. (Download page)
- WIZnet Configuration Tool. (Download page)
- TCP server / TCP client / UDP terminal program.
- Serial Terminal Program.
Hardware
- Your WIZ550SR module and Evaluation board
- Ethernet cable
- Micro USB B Type Cable
- Such as 5V DC adapter, USB port on your computer, or 3.3V Power source
Connect Your WIZ550SR
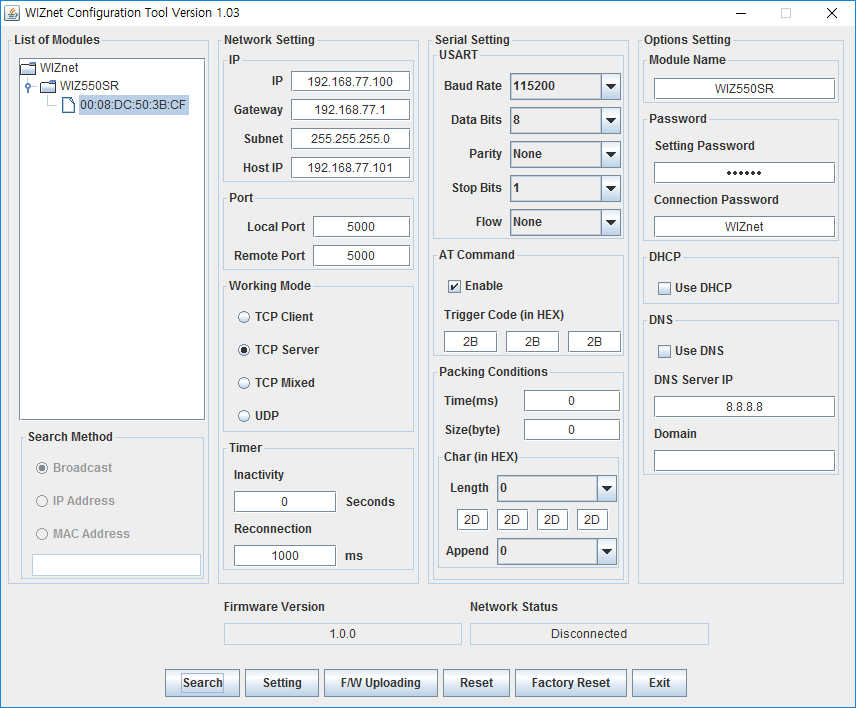
WIZ550SR Factory Settings
| Category | Item | Value |
|---|---|---|
| Network | Local IP | 192.168.77.100 |
| ::: | Local Gateway | 192.168.77.1 |
| ::: | Local Subnet | 255.255.255.0 |
| ::: | Local Port | 5000 |
| ::: | Remote Port | 5000 |
| ::: | Working Mode | TCP Server |
| ::: | Inactivity | 0 |
| ::: | Reconnection | 1000 |
| Data UART | Baud Rate | 115200 |
| ::: | Data Bits | 8 |
| ::: | Parity | NONE |
| ::: | Stop Bits | 1 |
| ::: | Flow | NONE |
| ::: | AT Command USE | Enable |
| ::: | Trigger Code | 2B/ 2B / 2B |
| ::: | Packing Condition Time | 0 |
| ::: | Packing Condition Size | 0 |
| ::: | Delimeter Length | 0 |
| ::: | Delimeter | 2D / 2D / 2D / 2D |
| ::: | Delimeter Appendix | 0 |
| Debug UART | Baud Rate | 115200 |
| ::: | Data Bits | 8 |
| ::: | Parity | NONE |
| ::: | Stop Bits | 1 |
| ::: | Flow | NONE |
| Options | Module Name | WIZ550SR |
| ::: | Setting Password | WIZnet |
| ::: | Connection Password | WIZnet |
| ::: | DHCP USE | Disable |
| ::: | DNS USE | Disable |
| ::: | DNS Server IP | 8.8.8.8 |
- Operation mode: TCP server mode
- Debug message: Enabled
- Serial command mode switch: Enabled
- Serial command mode switch code: +++ (hex code, [2B][2B][2B])
PC Settings
Double check that the WIZ550SR and the PC, or laptop you are using to set up WIZ550SR with are both on the same Ethernet network.
Example: PC Network Settings
* When the WIZ550SR's settings are factory default,
| Network Settings | PC or laptop (= Remote) | IP address | 192.168.77.101 | - |
|---|---|---|---|---|
| ::: | ::: | Gateway address | 192.168.77.1 | - |
| ::: | ::: | Subnet mask | 255.255.255.0 | - |
| ::: | ::: | Port number | 5000 | - |
-
User should to match the network settings of 'WIZ550SR's remote host' and 'PC (or laptop)' for testing TCP mode.
-
If the DHCP(automatic IP allocation) is used, both the WIZ550SR and test PC must be set to be assigned the same IP from the same router.
Connecting Steps
Step 1 : USB Driver Installation
Your PC should be installed USB Driver for use to WIZ550SR-EVB.
- WIZ550SR-EVB connects to a PC using a USB B Type Cable.
- Connect the RJ-45 connector of WIZ550SR-EVB and an RJ-45 connector of the PC using an Ethernet cable.
- Once the connected should be installed the USB Driver.(Download page)
- By running the Device Manager, check that the created two USB Serial Port.
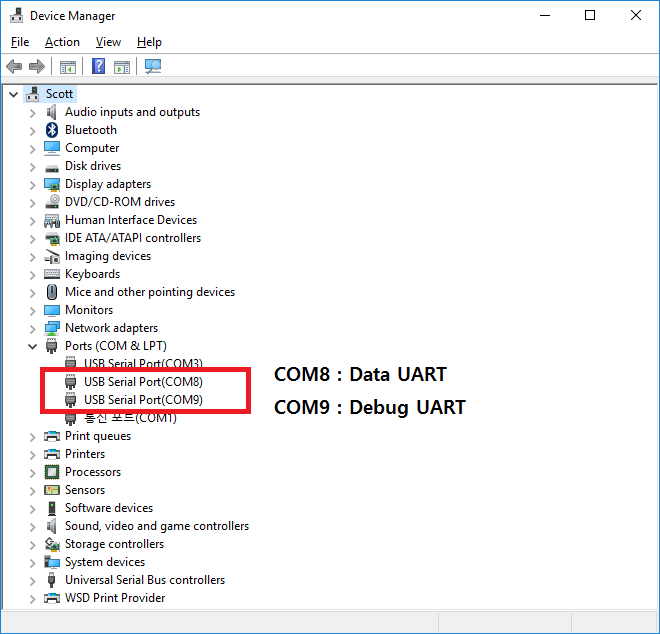
- Control Panel > System > Device Manager
- During the two USB Serial Port, Lower number port is data UART,
higher number port is Debug UART.
- ex) USB Serial Port(COM8) : Main UART - It is the port that Data is input and output.
- ex) USB Serial Port(COM9) : Debug UART - It is the port that Debug message is output.
Step 2 : Power Input
Check the initial state of WIZ550SR-EVB.
- On to the power SW of the WIZ550SR-EVB.
- Check the Power LED(Red LED) - Check the Power input.
- LD3 of WIZ550SR : On
- LD4 of WIZ550SR : On
- Check the Working LED(Green LED) - Check the operation state of
WIZ550SR.
- LD1 of WIZ550SR : Blink
- Check the Ethernet LED(Green LED) - Check the state of network.
- LD2 of WIZ550SR: Blink
- LD3 of WIZ550SR : On
Step 3 : Search & Debug Message
Run the Configuration tool on your PC, click the Search button at the top. If power is being input to the board and connected to the network is in operation,The MAC address and setting of WIZ550SR modules can be found in the Configuration tool.
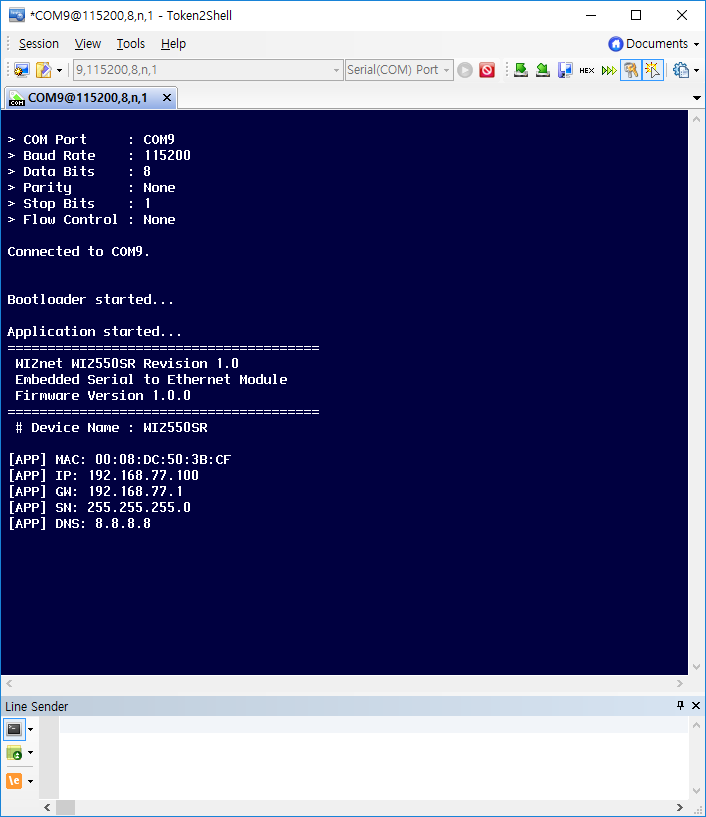
Run a serial terminal program of the PC, connect to the serial port of WIZ550SR Debug UART. When power is input to the board, you can check the Debug Message, such as the photo below.
Step 4: Set up your WIZ550SR
According to the user environment to change the setting value of the product. In this Step it performs an initial test is based on the factory default settings for the product.
- After changing settings in the Configuration tool, to apply the changed values and click the Setting button and you must enter the "Setting Password".
- The initial value of Setting Password is "WIZnet".
- Once the setup is complete, the message that comes out is a "Success Set" and WIZ550SR Reset.
Step 5: Connect
Connect the PC as the TCP client of the user’s serial device for data communication testing. In order to do this, the serial terminal program / TCP client terminal program must be opened on the PC. The serial terminal program and TCP client program must be set as below.
- Serial terminal program
- Data UART : 115200-8-N-1, Flow control: None
- Debug UART : 115200-8-N-1, Flow control: None
- TCP client program : 192.168.77.100:5000 (The IP address and port
number of WIZ550SR)
- After a connection to the WIZ550SR within 5 seconds to enter the "Connection Password".
- The initial value of Connection Password is "WIZnet".
- The connection is stopped within 5 seconds if connection Password did not enter.
Step 6: Verify
The basic data communication of the WIZ750SR can be verified as below.
- Serial to Ethernet : data communication verification
- Enter the character string in the serial terminal and check if the identical character string appears on the TCP client terminal.
- Ethernet to Serial : data communication verification
- Enter the character string in the TCP client terminal and check if the identical character string appears on the serial terminal.
Step 7: Done
Now you’re ready to use the WIZ550SR!
- This document is based on the assumption of the PC as the serial device / remote network device.
- The next step is to connect the WIZ550SR module to the target serial device and check if the device can communicate, control, and monitor via the remote PC or monitoring server.