EOE-W55RP20_BACnet Module Getting Started Guide
Firmware 1.0.0
This guide takes a new module to the point where it talks to a BACnet workstation, in four steps.
| Step | Contents |
|---|---|
| Step 1 | Wiring |
| Step 2 | Check that the module answers |
| Step 3 | Set the IP address |
| Step 4 | Turn on BACnet and find the device from a workstation |
The firmware is already written to the module. The MAC address and serial number are written during production, so there is nothing to enter.
This guide covers the shortest path: BACnet/IP with a workstation on the same subnet. For BACnet/SC (hubs and certificates) or a workstation on another subnet, see the BACnet Setup Guide.
What you need
- A module running the BACnet firmware: one of WIZ-IP20, W232N or EOE-W55RP20
- A USB-to-serial adapter, to connect the module's AT port to a PC
- An Ethernet cable and a PC on the same network as the module
- A terminal program such as Tera Term or PuTTY
- A BACnet workstation, used in step 4. The examples in this guide use YABE (Yet Another BACnet Explorer) 2.1.0, a free tool for Windows
Step 1: Wiring
AT commands are exchanged on UART1.
| Connection | EOE-W55RP20 | WIZ-IP20 | Other side |
|---|---|---|---|
| AT port TX | GP4 | P5 (TXD) | RX of the USB-serial adapter |
| AT port RX | GP5 | P3 (RXD) | TX of the USB-serial adapter |
| GND | GND | P9 (GND) | GND of the USB-serial adapter |
| Ethernet | RJ-45 | RJ-45 | Switch or PC |
The EOE-W55RP20 and WIZ-IP20 pins are 3.3 V TTL, so use a 3.3 V USB-serial adapter.
On the W232N, connect its RS232 port (DB9) to the PC's RS-232 port.
Cross TX and RX. The module's TX goes to the other side's RX. If the two wires are swapped nothing answers, which is the most common mistake on a first connection.
The flow control pins (GP6 CTS · GP7 RTS on the EOE-W55RP20, P6 CTS · P10 RTS on the WIZ-IP20) do not
need to be connected. The factory
default uses no flow control, and it can be turned on later with AT+UART.
The module boots as soon as power is applied.
Step 2: Check that the module answers
Open the terminal with these settings.
| Item | Value |
|---|---|
| Speed | 115200 |
| Data bits · parity · stop bits | 8 · none · 1 |
| Flow control | None |
| Line ending (transmit) | CR+LF |
When booting finishes, the module sends this line:
+READY:"1.0.0"
If you missed it, that is fine. Type AT and press Enter.
AT
OK
OK means the connection works. The module does not echo what you type, so the commands you
type do not appear on the screen; only the responses do (to see them, turn on Local echo in the
terminal). If nothing comes back, see Troubleshooting.
Next, check what the device is:
AT+VERSION?
+VERSION:"1.0.0","EOE-W55RP20_BACnet","EOE-W55RP20_BACnet-0008DC123456",0x454F4502
The fields are firmware version, model, serial number and product ID. The last part of the serial number is the module's MAC address, so it differs from module to module.

Checking status with the pins
To check the state from the board alone, without a PC, look at these output pins.
| EOE-W55RP20 | WIZ-IP20 | W232N | When high |
|---|---|---|---|
| GP10 | P13 (LINKLED) — when low | LINK LED on | The Ethernet link is up |
| GP11 | None | TCP LED on | At least one TCP connection exists on the AT socket channels |
| GP9 (DSR) | None | DB9 pin 6 (DSR) | The module is ready for AT commands |
The WIZ-IP20's P13 (LINKLED) is an LED signal driven directly by the Ethernet chip, so it goes
low when the link is up. The WIZ-IP20 has no TCP connection or DSR pin. Check TCP connections with
AT+SOCKSTATUS?, and whether the module is ready for commands with the +READY line at boot.
Step 3: Set the IP address
From the factory the module uses the static IP 192.168.11.2.
If the PC is on a different subnet it cannot reach the module. Change the module's address as shown below, or put the PC in the
192.168.11.xrange.
To use DHCP:
AT+NETMODE=DHCP
AT+SAVE
To use a static address:
AT+NETMODE=STATIC
AT+IP="192.168.0.100"
AT+MASK="255.255.255.0"
AT+GW="192.168.0.1"
AT+SAVE
Do not forget
AT+SAVE. Set commands only record the value in memory;AT+SAVEstores and applies it. This is the most common mistake.
Check the address in use. An address obtained by DHCP is shown by this command too.
AT+IP?
+IP:"192.168.0.100"
Step 3 is done when the module answers ping from the PC.
ping 192.168.0.100
Step 4: Turn on BACnet and find the device from a workstation
Turn on BACnet
From the factory BACnet is off. This keeps a device that has not been configured from appearing on the network; in this state the module does not answer a workstation's Who-Is at all.
Turn on BACnet/IP and set the Device instance and name.
AT+BACMODE=BIP
AT+BACDEV=1001,"AHU-1 Controller"
AT+SAVE
| Value | Meaning |
|---|---|
BIP | The module operates as BACnet/IP. BACnet/SC, which goes through a hub, is SC |
1001 | Device instance. Use a number from 0 to 4194302 that no other device on the network uses |
"AHU-1 Controller" | Device name (Object_Name). Up to 31 bytes |
If you do not set the instance, a number derived from the MAC address and a name of the form
EOE-W55RP20_BACnet-XXXXXX are used. The number comes from the low 22 bits of the MAC address, so
it rarely collides, but on a site a fixed number is usually assigned.
Check that it is running.
AT+BACMODE?
+BACMODE:BIP,RUNNING
AT+BACDEV?
+BACDEV:1001,"AHU-1 Controller"
RUNNING means the module is answering BACnet/IP on UDP 47808.
If
AT+BACDEV?shows an extra+BACDEV:APPLIED,…line, the settings differ from the values the module is answering with now. The line can remain for a moment right afterAT+SAVE. If it is still there a little later,AT+SAVEwas not sent.
Find the device with YABE
-
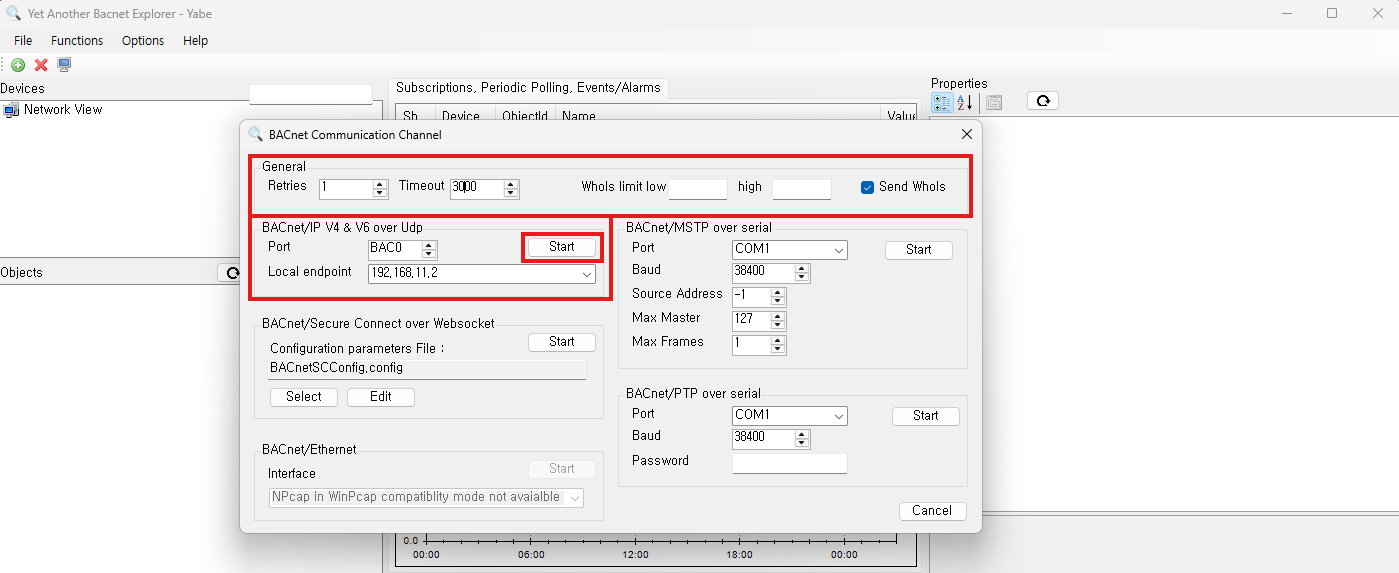
Start YABE and click Functions → Add BACnet Channel (the same as the Add Channel button on the toolbar). The BACnet Communication Channel window opens.
-
In the General box at the top of the window, change Timeout to
3000. Leave Send WhoIs checked. -
In the BACnet/IP V4 & V6 over Udp box, leave Port at
BAC0(47808 in hexadecimal). For Local endpoint, choose the PC address in the same range as the module. -
Click the Start in that box (to the right of the Port line). The window has five Start buttons; be sure to click the one in the BACnet/IP box.
-
A Udp channel appears under
Network Viewin the Devices tree at the top left, and within a few seconds Device 1001 appears under it. -
Click Device 1001, and the Device object and the Network Port object appear in the Objects pane at the bottom left. Click the Device object to show its properties in the Properties pane on the right.
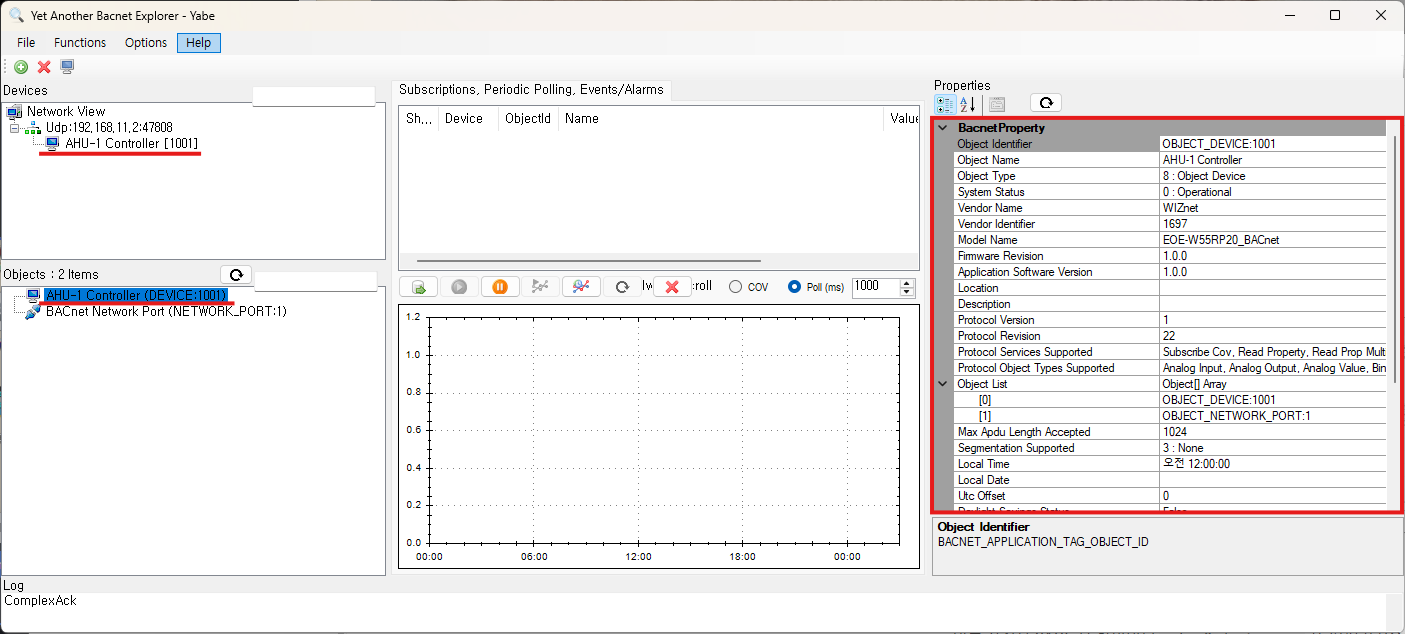
When the Properties pane shows the following, communication is confirmed.
| Property | Value |
|---|---|
| Object Name | AHU-1 Controller |
| Vendor Identifier | 1697 |
| Model Name | EOE-W55RP20_BACnet |
| Firmware Revision | 1.0.0 |
Why the Timeout is changed to 3000. YABE's default of 500 ms is shorter than the time the module waits for the host's approval of a confirmed write (750 ms). Change
DefaultTimeoutto 3000 in Options → Settings and it becomes the default for this window.
If a Windows Firewall prompt appears the first time YABE runs, allow YABE's traffic. If it is not allowed, the module's responses do not reach YABE and the device does not appear.
Publishing a value
The shortest way to publish a value from your device over BACnet:
AT+BOBJADD=AI,1,"Supply Temp",degrees-celsius
AT+SAVE
AT+BOBJVAL=AI,1,21.5
| Command | Meaning |
|---|---|
AT+BOBJADD | Creates Analog Input 1, with degrees Celsius as its unit. An object is visible on the network as soon as it is created |
AT+SAVE | Stores the object definition. Without it the object is gone after a reboot |
AT+BOBJVAL | Sends the value. No AT+SAVE needed |
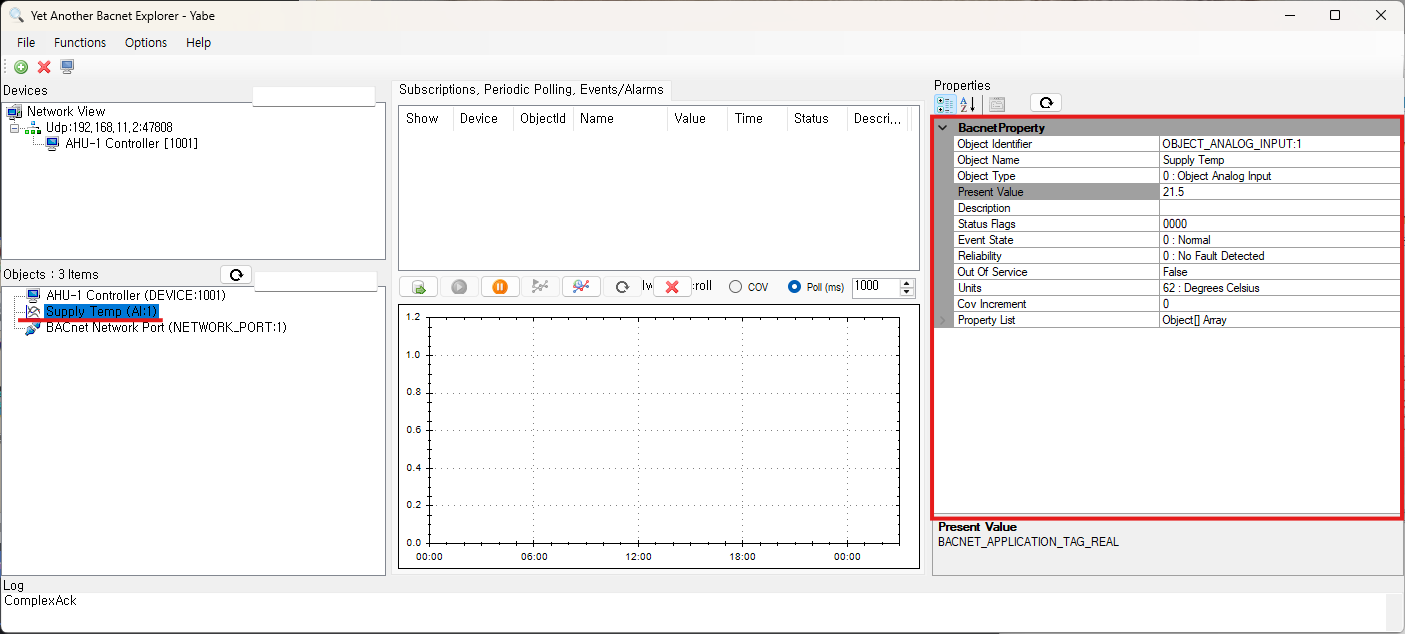
Click Device 1001 in YABE again, and Supply Temp appears in the Objects pane. Click it: its
Present Value is 21.5. Each time the value changes, send AT+BOBJVAL=AI,1,<new value>.
The nine object types, objects that a workstation writes, confirmed objects whose writes the host approves, and how to create many objects at once with a CSV file are in chapter 4 of the BACnet Setup Guide.
Troubleshooting
Nothing answers AT
| Check | Details |
|---|---|
| TX/RX direction | The module's TX (GP4 on the EOE-W55RP20, P5 on the WIZ-IP20, DB9 pin 3 on the W232N) must go to the other side's RX |
| Speed | The factory default is 115200. A board used elsewhere may have been changed |
| Port | AT commands are accepted only on UART1 (GP4/GP5 on the EOE-W55RP20, P5/P3 on the WIZ-IP20, the RS232 port on the W232N). The EOE-W55RP20's GP0/GP1 carry the debug log only |
| Flow control | If only the PC side has it on, the link looks frozen. Turn it off on both sides |
| Line ending | A command runs only when a line ending (CR, LF or CR+LF) arrives. Check that the terminal sends one on Enter |
| GND | Without a GND connection, communication is unreliable |
If nothing works, hold the EOE-W55RP20's FACT RSTn pin (GP18) low for 5 seconds or more to perform a factory reset. The AT port returns to 115200 8N1 with no flow control. On the W232N, use the factory reset switch inside the case. The WIZ-IP20 does not have this pin; if the web interface was left on, use Factory reset on its Maintenance tab.
A factory reset clears all settings. Network settings, BACnet settings, objects and stored values, and BACnet/SC certificates are all reset. The MAC address, serial number and product ID are kept.
The device does not appear in the workstation
- BACnet:
AT+BACMODE?must return+BACMODE:BIP,RUNNING. The factory default isOFF. Check thatAT+SAVEwas sent afterAT+BACMODE=BIP. - Address:
AT+IP?reports the address the module is actually using. It must be on the same subnet as the PC and answerping. - YABE channel: if the Devices tree shows only a COM port name such as
COM3, the Start that was clicked in the channel window was not the one in the BACnet/IP box. Right-click that channel → Remove Channel/Device to delete it, and do step 4 again. Also check that the Local endpoint is an address in the same range as the module. - PC: check that Windows Firewall is not blocking YABE, and that no other BACnet program using UDP 47808 is running on the same PC. On one PC, only one program can use 47808.
- A network that blocks broadcasts: use YABE's Functions → IP Services → Send unicast WhoIs to send a Who-Is directly to the module's IP address.
Settings or objects disappear after a reboot
Most likely AT+SAVE was not sent. Set commands and AT+BOBJADD survive a reboot only after
AT+SAVE.
AT+BOBJVAL returns ERROR:ACCESS_DENIED
For an object with a priority array, such as an Analog Output, the workstation's commands set the
value, so the host cannot write it. Otherwise, a workstation has put that object Out_Of_Service.
Check the object's flags with AT+BOBJ?.
Using the web interface
The web interface is disabled by default, so that an unconfigured device is not exposed on the network. It can be turned on only with an AT command.
From the factory there is no web password, so no one can log in. When turning the web
interface on, also set a password with AT+WEBPASS. The password must be at least 8
characters. The web commands are:
AT+WEB=1                 enable the web interface
AT+WEB=0                 disable
AT+WEB=1,600             enable + session timeout of 600 s (1 … 65535)
AT+WEB?                  → +WEB:1,600,SET   (MUSTCHANGE until a password is set)

AT+WEBUSER="admin"
AT+WEBUSER?              → +WEBUSER:"admin"

AT+WEBPASS="new-password"   8 … 63 bytes
AT+WEBTIMEOUT=600        1 … 65535 s
AT+WEBTIMEOUT?           → +WEBTIMEOUT:600
AT+SAVE
On the login page, enter the account name (factory default admin) in User and the password
set with AT+WEBPASS in Password.
Open it in a browser.
http://192.168.0.100:50003/
The port is 50003, not 80. If you enter only the address, the browser goes to port 80, gets no response, and the web interface looks as if it were off.
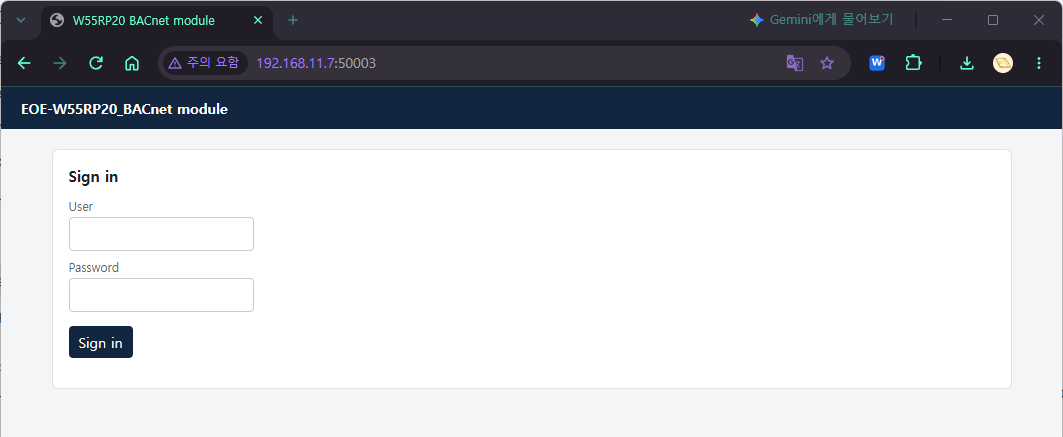
After you sign in, the Dashboard tab opens. Use the tab row at the top to move to the other pages.
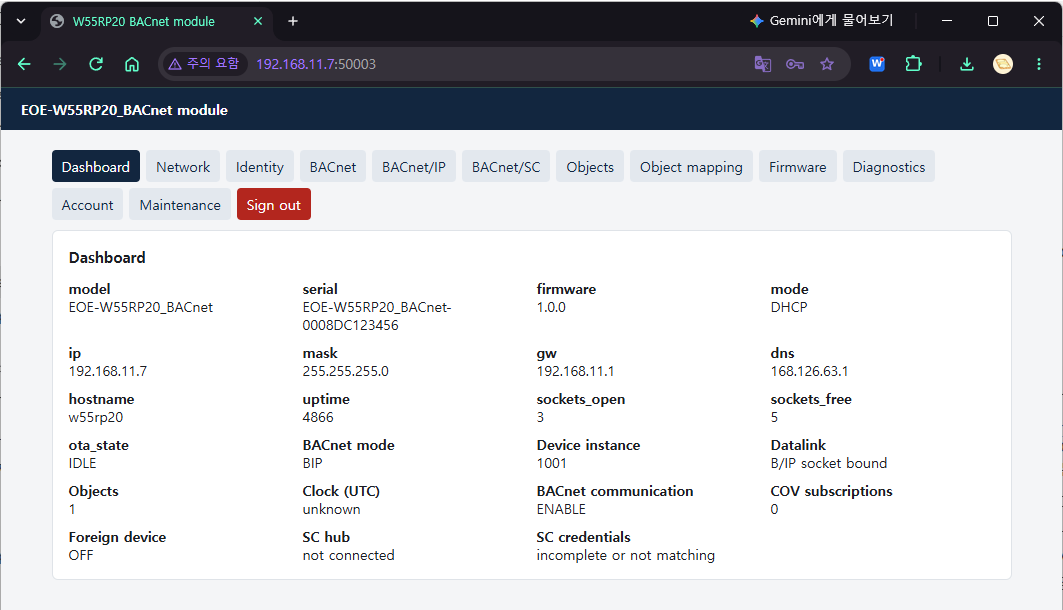
The web interface is HTTP. Passwords travel unencrypted, so use it on a trusted network only. When you have finished, click Sign out at the end of the tab row.
On the web interface you can configure BACnet, view the object list, register many objects at once with a CSV file, upload BACnet/SC certificates, update the firmware and check diagnostics. Each tab is described in chapter 2 of the BACnet Setup Guide.
Where to go next
| Document | Read it when |
|---|---|
| BACnet Setup Guide | Defining objects in detail, or setting up BACnet/SC, Foreign Device registration, time or passwords |
| AT Command Guide | Looking up the arguments and responses of a command |
| Product Overview | Getting an overview of the product's features |
| Firmware Update Guide | Updating the firmware of a running module |