EOE-W55RP20 SNMP Module SNMP Setup Guide
Firmware 1.2.0
This guide covers installing the SNMP tools on the manager PC, reading and writing over SNMPv3, v1/v2c communities, where objects are placed in the OID tree, CSV mapping, and Traps and Informs.
Wiring and IP setup are covered in the Getting Started Guide. If you are new to the module, first do chapter 0, Installing the SNMP manager, then complete up to step 4 of the Getting Started Guide, and continue here from chapter 1.
| Chapter | Contents |
|---|---|
| Chapter 0 | Installing the SNMP manager (net-snmp) |
| Chapter 1 | Reading and writing with SNMPv3 |
| Chapter 2 | Turning on SNMPv1 and v2c |
| Chapter 3 | Object addresses (OID) |
| Chapter 4 | Registering many objects at once with a CSV file |
| Chapter 5 | Confirmed SET |
| Chapter 6 | Sending Traps and Informs |
| Chapter 7 | Troubleshooting |
The examples use the module address 192.168.0.100, the manager PC 192.168.0.20 and
net-snmp as the manager tool. In the diagrams, items marked ▶ are introduced in that
section; the others were explained earlier. All command arguments and responses are described
in the AT Command Guide.
0. Installing the SNMP manager
The SNMP manager is the program that reads (GET) and writes (SET) the module's values and receives the notifications (Traps) the module sends. The examples in this guide use net-snmp, a free set of command-line tools.
| Program | What it does |
|---|---|
snmpget · snmpwalk · snmpset | Read and write the module's values |
snmptrapd | Receive the Traps and Informs the module sends (used in chapter 6) |
net-snmp 5.8 or later is required. The module uses SHA-256 for SNMPv3 authentication, which older versions of net-snmp do not support. Always check the version after installing.
Linux
Ubuntu · Debian:
sudo apt update
sudo apt install snmp snmptrapd
Fedora · RHEL · Rocky:
sudo dnf install net-snmp-utils net-snmp
Windows
The net-snmp installer published for Windows is an older version that does not support SHA-256. On Windows, use WSL (a Windows feature that runs Ubuntu inside Windows).
-
Open PowerShell as administrator and install Ubuntu. Restart the PC when it finishes.
wsl --install -d Ubuntu -
Open
Ubuntufrom the Start menu and set the user name and password it asks for on the first run. -
From here on, the procedure is the same as on Linux. In the Ubuntu window, enter the Ubuntu · Debian commands from Linux above to install net-snmp.
sudo apt updatesudo apt install snmp snmptrapd -
Then do Checking the installation and When results show only numbers below in the Ubuntu window, exactly as on Linux.
When using WSL, enter all the commands in this guide, such as snmpget · snmpwalk ·
snmpset · snmptrapd, in the Ubuntu window, not in Windows PowerShell or Command
Prompt. Commands that read and write values (snmpget · snmpwalk · snmpset) work without
any extra setup.
Receiving Traps in WSL needs one more setting. By default WSL uses an internal address that differs from the PC's, so a Trap the module sends to the PC's address does not reach
snmptrapdinside WSL. On Windows 11, create a.wslconfigfile in your user folder (C:\Users\<name>) with the two lines below, runwsl --shutdownin PowerShell, and open Ubuntu again.[wsl2]
networkingMode=mirroredThen allow incoming UDP port 162 in Windows Firewall.
macOS
Install with Homebrew. The net-snmp that comes with macOS is an older version, so add the newly installed one to the front of PATH.
brew install net-snmp
echo 'export PATH="$(brew --prefix net-snmp)/bin:$(brew --prefix net-snmp)/sbin:$PATH"' >> ~/.zshrc
source ~/.zshrc
Checking the installation
snmpget --version
NET-SNMP version: 5.9.4.pre2
Any version from 5.8 on is fine. You can now follow step 4 of the Getting Started Guide to read
the module's sysDescr.
When results show only numbers
With the default settings on Ubuntu · Debian, responses show numbers instead of names.
iso.3.6.1.2.1.1.1.0 = STRING: "EOE-ioNIC_SNMP SNMPv3 module, firmware 1.2.0"
Communication is working; only the display differs. To see names such as
SNMPv2-MIB::sysDescr.0, install the standard MIB files and comment out the mibs : line in
/etc/snmp/snmp.conf by adding # in front of it.
sudo apt install snmp-mibs-downloader
sudo sed -i 's/^mibs :/# mibs :/' /etc/snmp/snmp.conf
snmp-mibs-downloader is in the multiverse repository on Ubuntu and non-free on Debian.
If you cannot install it, you can keep the numeric display; it works the same.
Using a graphical tool
A graphical tool such as a MIB browser can be used instead of the command line. First check that it supports SNMPv3 SHA-256 authentication and AES-128 encryption. If it does not, create a separate SHA-1 user on the module (AT Command Guide chapter 6).
1. Reading and writing with SNMPv3
This chapter uses the user admin1 created in
step 4 of the Getting Started Guide. How to create
more users or choose roles and security levels is in
AT Command Guide chapter 6.
Set net-snmp's -l option according to the security level chosen on the module.
Module (AT+USMADD) | net-snmp -l |
|---|---|
NOAUTHNOPRIV | noAuthNoPriv |
AUTHNOPRIV | authNoPriv |
AUTHPRIV | authPriv |
Read all the standard objects at once.
snmpwalk -v3 -l authPriv -u admin1 -a SHA-256 -A authpass123 -x AES -X privpass123 \
         192.168.0.100 1.3.6.1.2.1.1
The 11 standard objects below can be read from the start, without creating any objects. All of them are read-only.
| OID | Name |
|---|---|
1.3.6.1.2.1.1.1.0 ~ 1.3.6.1.2.1.1.7.0 | sysDescr · sysObjectID · sysUpTime · sysContact · sysName · sysLocation · sysServices |
1.3.6.1.2.1.11.1.0 · .2.0 · .3.0 · .6.0 | snmpInPkts · snmpOutPkts · snmpInBadVersions · snmpInASNParseErrs |
If you get Invalid authentication protocol, your net-snmp version is too old to support
SHA-256. Upgrade net-snmp to 5.8 or later (chapter 0), or create the user
with SHA1.
Writing a value requires a writable (RW) object. The standard objects are all read-only,
so create a test object writeTest as number 3 on the AT port.
AT+OBJADD=3,"writeTest",Integer32,RW,VOLATILE
AT+SAVE
The address of writeTest is 1.3.6.1.4.1.52942.3.0 (chapter 3). Write a value
to it from the manager.
snmpset  -v3 -l authPriv -u admin1 -a SHA-256 -A authpass123 -x AES -X privpass123 \
         192.168.0.100 1.3.6.1.4.1.52942.3.0 i 1
The write succeeded if you see this:
SNMPv2-SMI::enterprises.52942.3.0 = INTEGER: 1
At the same time, the host MCU receives a notification on the AT port that the value changed.
 +SNMPSET:3,1
          : :
          : :
          : '-  new value the manager wrote
          '---  number of the object that changed
A SET to an object that does not exist returns a
noCreationerror. Objects cannot be created over SNMP, only with AT commands or a CSV file (chapter 4).
2. Turning on SNMPv1 and v2c
v1 and v2c are off by default. Both rely on a community string alone for access control, and the string is sent over the network unencrypted. Turn them on only when necessary, and only on a trusted network.
Communities are shared by v1 and v2c, so register them once in 2.1. Then follow 2.2 (v2c) or 2.3 (v1), depending on the version your manager uses.
2.1 Registering communities
A community is a password-like string that a v1 · v2c manager sends with each request, and the role assigned to it determines what it may do. Create one for reading and one for writing.
AT+COMMADD="ro-poll",MONITOR
AT+COMMADD="rw-ctrl",OPERATOR
AT+SAVE
Check with this command:
AT+COMM?
The result should look like this:
+COMM:"ro-poll",Monitor,ENABLED
+COMM:"rw-ctrl",Operator,ENABLED
- On the web interface, the same settings are on the
v1/v2ctab. - The rules for communities are in AT Command Guide chapter 6.
Communities are not accepted until their version is turned on, which the next sections do.
A wrong setting gets no response at all. Requests in a disabled version or with a wrong community do not even get an error response, so the manager only shows
Timeout. If nothing answers, checkAT+SNMPVER?andAT+COMM?first.
2.2 Reading and writing with v2c
Turn on v2c. AT+SNMPVER takes all the versions to answer, so include v3, which you are
already using. Leaving v3 out disables SNMPv3 access.
AT+SNMPVER=2,3
AT+SAVE
Check with this command:
AT+SNMPVER?
The result should look like this:
+SNMPVER:2,3
Read values from the manager PC. -v2c selects the version and -c the community.
snmpget -v2c -c ro-poll 192.168.0.100 1.3.6.1.2.1.1.5.0
snmpwalk -v2c -c ro-poll 192.168.0.100 1.3.6.1.4.1.52942
Write to writeTest (object 3), created in chapter 1, using the rw-ctrl
community, which has write permission.
snmpset -v2c -c rw-ctrl 192.168.0.100 1.3.6.1.4.1.52942.3.0 i 1
2.3 Reading and writing with v1
v1 is the first version of SNMP. Turn it on when your management system supports only v1.
Add 1 to the version list; if you do not need v2c, 1,3 is enough.
AT+SNMPVER=1,2,3
AT+SAVE
Check with this command:
AT+SNMPVER?
The result should look like this:
+SNMPVER:1,2,3
On the manager PC, select the version with -v1. Use the communities created in 2.1.
snmpget -v1 -c ro-poll 192.168.0.100 1.3.6.1.2.1.1.5.0
snmpwalk -v1 -c ro-poll 192.168.0.100 1.3.6.1.4.1.52942
snmpset -v1 -c rw-ctrl 192.168.0.100 1.3.6.1.4.1.52942.3.0 i 1
v1 lacks the features added in v2c and later, so the same objects give slightly different results.
| What differs with v1 | Why |
|---|---|
Counter64 objects are missing from a walk, and snmpget returns noSuchName | v1 has no 64-bit counter type. The object still exists; it just cannot be read over v1 |
snmpbulkwalk cannot be used | GETBULK, which fetches many values at once, does not exist in v1. Use snmpwalk |
Reading an object that does not exist returns noSuchName | The v1 error that corresponds to noSuchObject · noSuchInstance in v2c · v3 |
Writing a wrong value returns badValue | Corresponds to wrongValue · wrongType and similar in v2c · v3 |
| Informs cannot be received | v1 has no Inform. Notifications arrive as Traps only (chapter 6) |
The full mapping between v2c · v3 errors and v1 errors is under "Differences under v1" in AT Command Guide chapter 5.
3. Object addresses (OID)
An OID is an object's address. The manager finds objects by this address, not by their
names (writeTest). That is why the snmpset in chapter 1 used 1.3.6.1.4.1.52942.3.0
instead of the name.
An OID is a series of numbers joined by dots, going from the broadest category on the left to
the narrowest on the right. Split by position, the address of writeTest from chapter 1 looks
like this:
 1.3.6.1.4.1 . 52942 . 3 . 0
 '----+----'   '-+-'   :   :
      :          :     :   :
      :          :     :   '-  marks an object with a single value. Always 0 (SNMP convention)
      :          :     '-----  object number. First argument of AT+OBJADD
      :          '-----------  company number assigned to the module's manufacturer (enterprise number)
      '----------------------  company area. The prefix shared by all companies
The spaces in the diagram are only for readability; the actual address is written without
them, as 1.3.6.1.4.1.52942.3.0.
The standard object you read in chapter 1 (sysDescr) has an address that starts
differently.
| Object | Address | Start of the address |
|---|---|---|
sysDescr (standard object) | 1.3.6.1.2.1.1.1.0 | 1.3.6.1.2.1 — standard objects common to all SNMP devices |
writeTest (object you created) | 1.3.6.1.4.1.52942.3.0 | 1.3.6.1.4.1 — where each company places its own objects |
Every object you create starts with 1.3.6.1.4.1.52942.
3.1 The default rule
If no OID is given in AT+OBJADD, the address is set automatically from the object
number.
1.3.6.1.4.1.52942.<object number>.0
| Command | Object address |
|---|---|
AT+OBJADD=1,"temperature",... | 1.3.6.1.4.1.52942.1.0 |
AT+OBJADD=3,"writeTest",... | 1.3.6.1.4.1.52942.3.0 |
In most cases this rule is all you need. Sections 3.2 to 3.4 are needed only in specific cases.
3.2 Adding a product number
When one company uses this module in several products, their object addresses overlap. To tell the products apart, add a product number after the company number.
AT+PRODUCTARC=7
AT+SAVE
Objects created after this get the product number between the company number and the object number. Object 1, for example, gets this address:
 1.3.6.1.4.1.52942 . 7 . 1 . 0
 '-------+-------'   :   :   :
         :           :   :   :
         :           :   :   '-  always 0
         :           :   '-----  object number
         :           '---------▶ product number set with AT+PRODUCTARC=7
         '---------------------  up to the company number (as above)
The addresses of existing objects do not change, so decide on this before creating
objects. If you set it only to try it out, restore it with AT+PRODUCTARC=0 and AT+SAVE. The rest of this guide
assumes addresses without a product number. The full rules are in
AT+PRODUCTARC.
3.3 Setting the address yourself
To use an address other than the default, give the OID as the last argument of AT+OBJADD.
AT+OBJADD=20,"inletTemp",Integer32,RO,VOLATILE,"1.3.6.1.4.1.52942.10.1.0"
AT+SAVE
Everything after the company number can be chosen freely.
 1.3.6.1.4.1.52942 . 10.1 . 0
 '-------+-------'   '+-'   :
         :            :     :
         :            :     '-  always 0
         :            '-------▶ the part you choose. Here 10 = temperature group, 1 = first sensor
         '--------------------  up to the company number (as above). Fixed
The address must start with 1.3.6.1.4.1.52942; otherwise it is refused with
ERROR:OID_OUT_OF_SUBTREE. Addresses that are too long are also refused; the length limits are
described in AT+OBJADD.
3.4 Identifying the end-product manufacturer
A manager reads sysObjectID (1.3.6.1.2.1.1.2.0) to identify the device's manufacturer and
product. The default is the module manufacturer's number (1.3.6.1.4.1.52942), so management
systems show the device as a product of the module manufacturer. Change it to the end-product
manufacturer's number.
AT+SYSOBJID="1.3.6.1.4.1.12345.1.1"
AT+SAVE
 1.3.6.1.4.1 . 12345 . 1.1
 '----+----'   '-+-'   '+'
      :          :      :
      :          :      '--▶ product identification chosen by the manufacturer (e.g. line 1, model 1)
      :          '---------▶ end-product manufacturer's number, obtained from IANA
      '--------------------  company area (as above)
12345 is only an example; use the end-product manufacturer's actual number. If you set it
only to try it out, restore the default with AT+SYSOBJID="" and AT+SAVE.
This setting changes only how the manufacturer is identified. Object addresses still start
with 1.3.6.1.4.1.52942. Details are in
AT+SYSOBJID.
The device description, name, contact and location that management systems show in their device lists can also be set with AT commands. Use them to tell devices apart when several are installed.
| SNMP object | AT command | Example |
|---|---|---|
| sysDescr (device description) | AT+SYSDESCR | AT+SYSDESCR="Acme UPS-3000 controller" |
| sysName (device name) | AT+SYSNAME | AT+SYSNAME="ups-lab-03" |
| sysContact (contact) | AT+SYSCONTACT | AT+SYSCONTACT="ops@example.com" |
| sysLocation (location) | AT+SYSLOCATION | AT+SYSLOCATION="Seoul HQ, B2, rack 4" |
The values can be read over SNMP right away; send AT+SAVE to keep them after a reboot. They
are read-only over SNMP, so a manager cannot change them.
3.5 Checking object addresses
AT+OBJ?
The result looks like this:
+OBJ:1,"temperature",1.3.6.1.4.1.52942.1.0,Integer32,RO,VOLATILE,IMMEDIATE,""
+OBJ:3,"writeTest",1.3.6.1.4.1.52942.3.0,Integer32,RW,VOLATILE,IMMEDIATE,""
+OBJ:20,"inletTemp",1.3.6.1.4.1.52942.10.1.0,Integer32,RO,VOLATILE,IMMEDIATE,""
Object 1 from the Getting Started Guide, object 3 from chapter 1 and object 20 from 3.3 are
listed in address order. The third value is the object's address, so this is where to look up
the OID to use in the manager. The other values are explained in
AT+OBJ?.
4. Registering many objects at once with a CSV file
When there are many objects, you can register the whole object table with a single CSV file instead of sending AT commands one line at a time. CSV files can be uploaded only on the web interface.
When the product is configured from the host MCU alone, without the web interface, create the
objects with AT+OBJADD and set the same attributes as the CSV (set mode, range, unit,
description, default) with AT+OBJATTR.
4.1 File format
The CSV template can be downloaded from the web interface (4.2, step 1). The first line contains the column names. The columns can be in any order, and the names are not case-sensitive.
object_id,name,oid,type,access,persistence,set_mode,min_value,max_value,unit,description,default_value
1,siteName,1.3.6.1.4.1.52942.1.0,OctetString,RW,PERSISTENT,IMMEDIATE,0,0,,Where this unit is installed,
2,deviceTemp,1.3.6.1.4.1.52942.2.0,Integer32,RO,VOLATILE,IMMEDIATE,-40,85,degC,Board temperature,0
3,humidity,1.3.6.1.4.1.52942.3.0,Gauge32,RO,VOLATILE,IMMEDIATE,0,100,%RH,Relative humidity,0
10,relayOut,1.3.6.1.4.1.52942.10.0,Integer32,RW,VOLATILE,CONFIRMED,0,1,,Relay; host must agree first,0
11,opMode,1.3.6.1.4.1.52942.11.0,Integer32,RW,PERSISTENT,IMMEDIATE,0,3,,0 off 1 auto 2 manual 3 svc,1
The line for object 2 in the example above, split into fields and numbered, looks like this. The numbers match the table below.
 2,deviceTemp,1.3.6.1.4.1.52942.2.0,Integer32,RO,VOLATILE,IMMEDIATE,-40,85,degC,Board temperature,0
 : '---+----' '---------+---------' '---+---' :  '--+---' '---+---' '+' :  '+-' '-------+-------' :
 1     2                3               4     5     6         7      8  9   10          11        12
| No. | Column | Required | Values | If omitted | Example (object 2) |
|---|---|---|---|---|---|
| 1 | object_id | ● | 1 … 65535. The number the host uses in AT+OBJVAL | — | 2 |
| 2 | name | ● | Up to 19 bytes | — | deviceTemp |
| 3 | oid | ● | Numbers separated by dots, under 1.3.6.1.4.1.52942 | — | 1.3.6.1.4.1.52942.2.0 |
| 4 | type | ● | Integer32 Unsigned32 Gauge32 Counter32 Counter64 TimeTicks OctetString IpAddress | — | Integer32 |
| 5 | access | ● | RO · RW | — | RO |
| 6 | persistence | VOLATILE · PERSISTENT | VOLATILE | VOLATILE | |
| 7 | set_mode | IMMEDIATE · CONFIRMED (chapter 5) | IMMEDIATE | IMMEDIATE | |
| 8 | min_value | Integer. Smallest allowed value. See below | No limit | -40 | |
| 9 | max_value | Integer. Largest allowed value. See below | No limit | 85 | |
| 10 | unit | Up to 7 bytes | Empty | degC | |
| 11 | description | Up to 31 bytes. Longer text is cut and reported as a warning | Empty | Board temperature | |
| 12 | default_value | Integer. Starting value of an integer object | 0 | 0 |
- A file with only the five required columns is enough.
min_value·max_valuelimit the value for numeric objects and the length forOctetString. Both0means no limit. An SNMP SET outside the range is refused withwrongValue. They do not apply toCounter64.default_valuetakes integers only, so it cannot be used for string or IP address objects.- Enclose values that contain a comma in double quotes, and write a double quote inside a
value as
"". - A UTF-8 BOM saved by Excel,
CRLFline endings and empty lines at the end of the file are fine as they are. - A line can be up to 512 bytes, with up to 16 columns.
4.2 Uploading
Upload the file on the OID mapping tab of the web interface. How to turn on the web
interface is described in "Using the web interface" in the Getting Started Guide.
-
Click
Download templateto get the CSV template (oid_template.csv). It contains only the column names, so fill in one object per line as in the example in 4.1. To edit the object table currently in use, download it withExport active mappinginstead.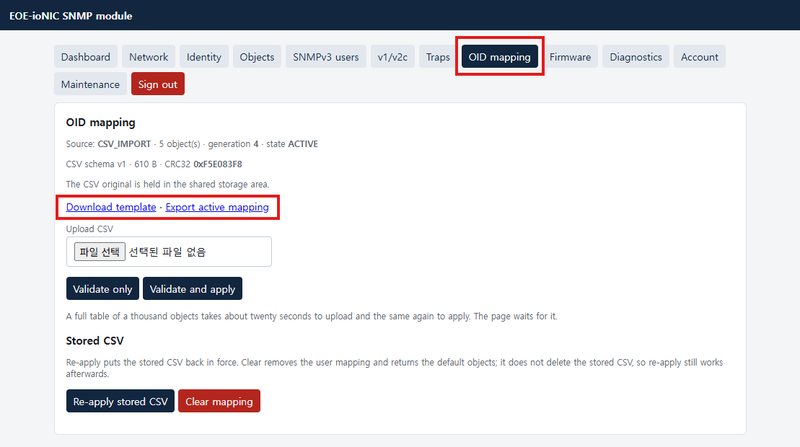
-
Click the file button under
Upload CSVand choose the filled-in file.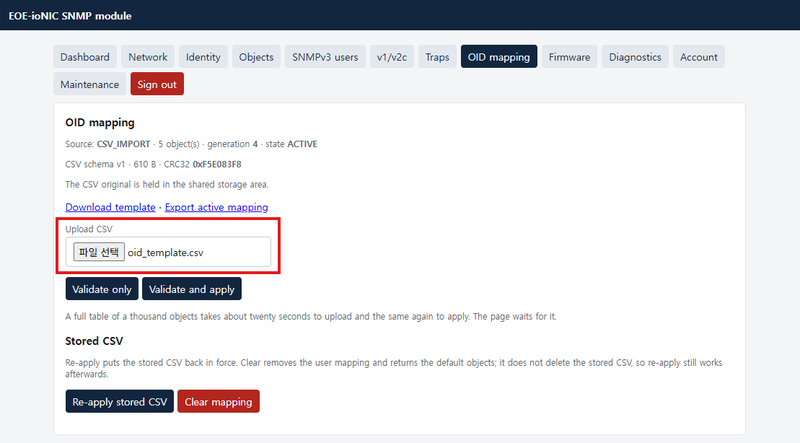
-
Click
Validate only. The file is only checked, not applied, so the result ends with- not appliedeven when there are no errors.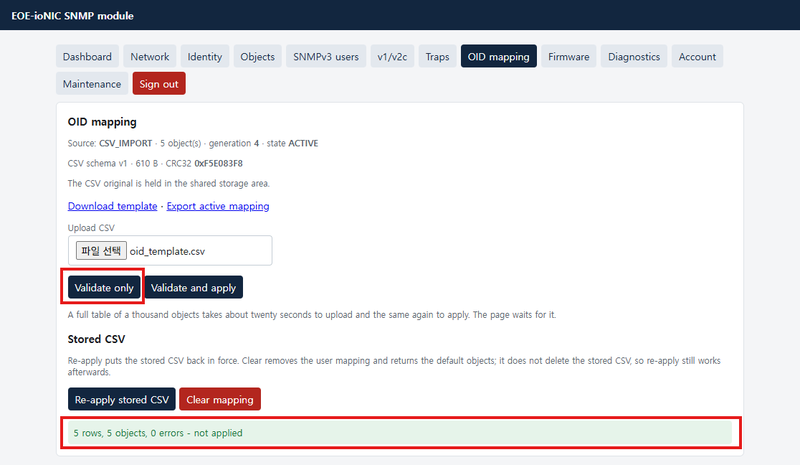
-
If there are no errors, click
Validate and apply. The file is applied when the result ends with- applied.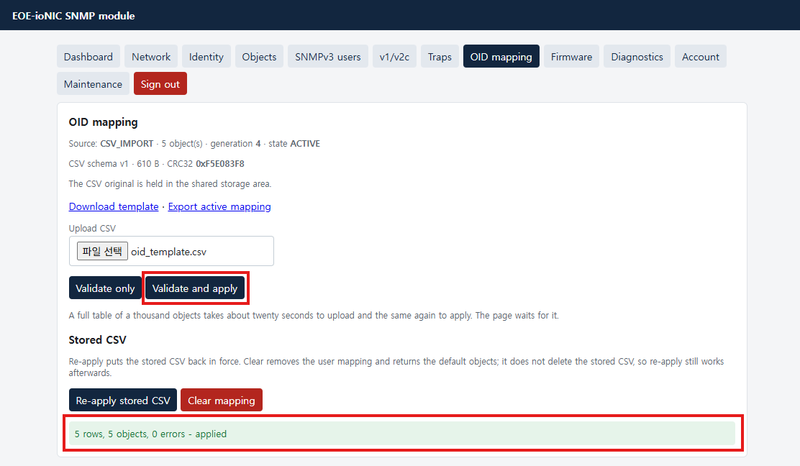
Check the applied objects on the Objects tab of the web interface. After applying the
example in 4.1, it looks like this:
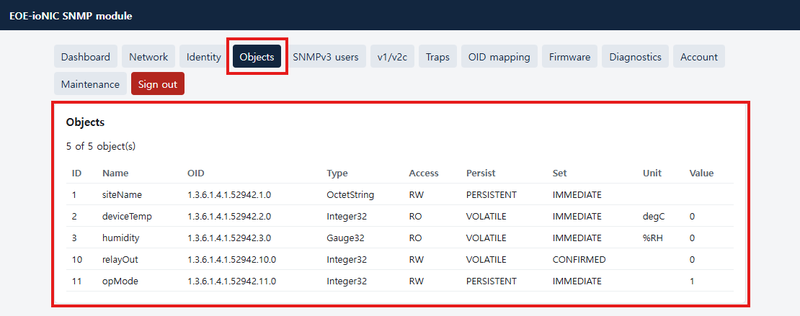
Value is the current value. No value has been written yet, so the CSV's default_value is
shown. On the AT port, AT+OBJ? shows the same list.
If there are errors, the cause is shown for each line, and if any line has an error, nothing is applied. The existing object table is kept as it is.
6 rows, 1 objects, 5 errors - not applied
Row 3, Column oid: OID is outside the enterprise subtree
Row 4, Column type: unsupported object type
A large table of about 1000 objects takes about 20 seconds to upload and another 20 seconds to apply. Do not close the page until it finishes.
4.3 Things to know when applying
- The whole object table is replaced by the CSV. Objects created with AT commands are also removed if the CSV does not include them.
- The result is stored immediately, so no
AT+SAVEis needed. - A value stored for a
PERSISTENTobject is restored only to its original object; it does not move to a different object that merely has the same number. - The uploaded CSV is kept on the module. The source shown by
AT+OIDMAP?is thenCSV_IMPORT, which changes toCSV_IMPORT_MODIFIEDonce objects are changed with AT commands.
4.4 Checking, re-applying and clearing with AT commands
A CSV can be uploaded only on the web interface, but checking, re-applying and clearing it afterwards can also be done with AT commands.
| To | Web (OID mapping tab) | AT |
|---|---|---|
| Check the current mapping | Status line at the top of the tab | AT+OIDMAP? |
| Re-apply the stored CSV | Re-apply stored CSV | AT+OIDMAPRELOAD |
| Remove all user objects | Clear mapping | AT+OIDMAPCLEAR="CONFIRM" |
Check — See how the object table was created and how many objects it has.
AT+OIDMAP?
After applying the example in 4.1, the result looks like this. The original size and CRC depend on the file.
+OIDMAP:CSV_IMPORT,5,1,<original size>,<original CRC32>,ACTIVE
| Value | Meaning |
|---|---|
CSV_IMPORT | Source of the object table. See the table below |
5 | Number of objects |
1 | Version of the CSV format |
| Original size · original CRC32 | Size in bytes and check value of the stored CSV. Use them to tell which file was uploaded |
ACTIVE | ACTIVE if objects exist, EMPTY if there are none |
| Source | Meaning |
|---|---|
DEFAULT | No user objects |
MANUAL_AT | Created with AT commands (AT+OBJADD) |
CSV_IMPORT | Uploaded as a CSV on the web interface |
CSV_IMPORT_MODIFIED | Uploaded as a CSV, then changed with AT commands |
Re-apply — Rebuild the object table from the CSV stored on the module. Use this to return to the CSV state after changing objects with AT commands.
AT+OIDMAPRELOAD
If no CSV is stored, the result is ERROR:CSV_NOT_AVAILABLE. With many objects this takes a
while, so wait for OK.
Clear — Remove all user objects. To prevent accidents, "CONFIRM" must be written
exactly.
AT+OIDMAPCLEAR="CONFIRM"
Only the object table is emptied; the stored CSV is kept, so it can be applied again later
with AT+OIDMAPRELOAD. Network settings, SNMPv3 users and communities stay as they are.
Starting a firmware update erases the stored CSV. The object table in use stays, but there is no longer a file to re-apply. If you manage objects with a CSV, upload the same CSV again after the update. A factory reset erases both the CSV and the object table.
5. Confirmed SET
For objects where writing a value makes the device actually do something, such as a relay,
you can have the host MCU approve the manager's SET before it is applied. Write CONFIRMED in
the CSV's set_mode column, or set it with an AT command. For example, to make object 10 a
confirmed object:
AT+OBJATTR=10,SETMODE,CONFIRMED
AT+SAVE
When the manager sends a SET to such an object, the module asks the host with
+SNMPSET:<request number>,<object>,<value>, and the host approves or refuses with
AT+SETACK within 750 ms. The response format and rules are in
AT+SETACK.
For example, when the manager writes 1 to object 10, this notification arrives on the AT port:
 +SNMPSET:27,10,1
          :  :  :
          :  :  :
          :  :  '-  value the manager wants to write
          :  '----  object number
          '-------  request number. Repeat it in AT+SETACK
To approve, answer with the same request number.
AT+SETACK=27,OK
To refuse, answer like this:
AT+SETACK=27,FAIL
6. Sending Traps and Informs
6.1 Traps and Informs
| Trap | Inform | |
|---|---|---|
| Acknowledgement | None | Waits for the receiver's response |
| If delivery fails | The module cannot tell | Resent a set number of times, then ERROR:NOTIFY_NO_RESPONSE |
| v1 | ● | Not available |
| v2c | ● | ● |
| v3 | ● | ● (with authentication, receiver keys must be registered, 6.5) |
Up to 4 receivers can be registered, numbered 0 to 3.
6.2 Registering receivers
Register the receiver according to the SNMP version the manager uses. Follow only the one of
the three subsections below that matches your manager. On the web interface, the same settings are on the Traps
tab, and AT+TARGET? shows what is registered.
6.2.1 v3 receiver
Create a notification-only user (NOTIFICATION role) and register the receiver so that
notifications are sent as that user.
AT+USMADD="trapuser",AUTHPRIV,SHA256,"trapauth123",AES128,"trappriv123",NOTIFICATION
AT+TARGETADD=0,"192.168.0.20",162,"trapuser",AUTHPRIV
The arguments of the command above are:
 AT+TARGETADD=0,"192.168.0.20",162,"trapuser",AUTHPRIV
              : '-----+------' '+' '---+----' '--+---'
              :       :         :      :         :
              :       :         :      :         '-----  security level
              :       :         :      '---------------  user
              :       :         '----------------------▶ port the notifications go to. Usually 162
              :       '--------------------------------▶ address of the manager PC that receives notifications
              '----------------------------------------▶ receiver number (0 to 3)
AT+SAVE
6.2.2 v2c receiver
A v2c receiver takes a version and a community instead of a user and security level. First register the community to use for notifications.
AT+COMMADD="trap-c",NOTIFICATION
AT+TARGETADD=1,"192.168.0.20",162,"",,TRAP,3,1000,V2C,"trap-c"
v2c has no user or security level, so those two positions are left empty. The commas stay so that the remaining arguments keep their positions.
 AT+TARGETADD=1,"192.168.0.20",162,"",,TRAP,3,1000,V2C,"trap-c"
              : '-----+------' '+' : : '+-' : '+-' '+' '--+---'
              :       :         :  : :  :   :  :    :     :
              :       :         :  : :  :   :  :    :     '-----  community
              :       :         :  : :  :   :  :    '-----------▶ version (V1, V2C or V3)
              :       :         :  : :  :   :  '----------------▶ response timeout in ms (Inform only)
              :       :         :  : :  :   '-------------------▶ retries (Inform only)
              :       :         :  : :  '-----------------------▶ kind (TRAP or INFORM)
              :       :         :  : '--------------------------  security level (empty)
              :       :         :  '----------------------------  user (empty)
              :       :         '-------------------------------  port
              :       '-----------------------------------------  manager PC address
              '-------------------------------------------------  receiver number
Retries and the response timeout are used by Informs only. If an Inform gets no response within the timeout, it is resent up to the number of retries. Traps do not wait for a response, so these two values are not used for them.
AT+SAVE
Whether a Trap or an Inform is sent is decided by the sending command, not at registration (6.3). One receiver can therefore get both Traps and Informs. To change the Inform retries and response timeout, register the same number again.
AT+TARGETADD=1,"192.168.0.20",162,"",,INFORM,5,2000,V2C,"trap-c"
AT+SAVE
6.2.3 v1 receiver
The same as v2c, with V1 as the version. Register the community first if it does not exist;
if you created trap-c in 6.2.2, skip this command.
AT+COMMADD="trap-c",NOTIFICATION
AT+TARGETADD=3,"192.168.0.20",162,"",,TRAP,3,1000,V1,"trap-c"
AT+SAVE
v1 has no Inform. Registering a V1 receiver as INFORM is refused with
ERROR:NOT_SUPPORTED, and AT+INFORMSEND is not delivered to v1 receivers. Use only
AT+TRAPSEND for v1 receivers.
6.3 Sending
To send a Trap:
AT+TRAPSEND=1001,2
To send an Inform:
AT+INFORMSEND=1001,2
The notification is sent to every registered receiver, as a Trap or an Inform according
to the command, regardless of the TRAP · INFORM given at registration. Both commands take
the same arguments.
To send an Inform to a v3 receiver (6.2.1), the keys in 6.5 must be
registered first. Without them, nothing is sent to that receiver and the result is
ERROR:ACCESS_DENIED.
| Argument | Meaning |
|---|---|
First (1001) | Notification number. Chosen by the host to tell kinds of notification apart |
Second (2, optional) | Object number to include. Its OID and current value are carried in the notification |
6.3.1 Contents of a v2c or v3 notification
What the manager receives when no product number (3.2) is used:
| Variable | Value |
|---|---|
sysUpTime.0 | Module uptime |
snmpTrapOID.0 | 1.3.6.1.4.1.52942.1001 (company number + [product number] + notification number) |
| OID of object 2 | Current value of object 2 |
Split up, the value of snmpTrapOID.0 looks like this. Unlike an object address, it does not
end in .0.
 1.3.6.1.4.1.52942 . 1001
 '-------+-------'   '+-'
         :            :
         :            '---▶ notification number. First argument of AT+TRAPSEND
         '----------------  up to the company number (as in chapter 3)
6.3.2 Contents of a v1 notification
A v1 Trap uses a different format: the notification number is not appended to the OID but
carried in a separate field. Instead of the snmpTrapOID.0 and sysUpTime.0 variables, the
same information is in the fields below.
| v1 Trap field | Value |
|---|---|
| enterprise | 1.3.6.1.4.1.52942 (up to the product number if AT+PRODUCTARC is used) |
| agent-addr | IP address the module is using now |
| generic-trap | 6 (enterpriseSpecific — a notification defined by the company) |
| specific-trap | Notification number (first argument of AT+TRAPSEND, e.g. 1001) |
| time-stamp | Module uptime |
| Variable | OID and current value of object 2 |
The manager identifies the kind of notification from the enterprise and specific-trap values.
6.4 Receiving on the manager (net-snmp snmptrapd)
On the manager PC, snmptrapd receives the notifications. Its configuration file is
/etc/snmp/snmptrapd.conf on Ubuntu · Debian; add the settings for the version you registered
in 6.2.
6.4.1 Receiving v3 notifications
createUser -e 0x8000CECE030008DC123456 trapuser SHA-256 trapauth123 AES trappriv123
authUser log trapuser
For a v3 Trap the module is the authoritative engine, so createUser -e takes the module's
engine ID. Read it with the command below and put 0x in front of the value.
AT+ENGINEID?
The result looks like this:
+ENGINEID:"8000CECE030008DC123456"
6.4.2 Receiving v2c and v1 notifications
Configure snmptrapd to log notifications that arrive with the community trap-c. This one
line covers both v2c and v1.
authCommunity log trap-c
6.4.3 Running it
After changing the configuration, restart the service. For a first check, it is easier to
stop the service and run snmptrapd directly, so that received notifications appear on screen
right away.
sudo systemctl stop snmptrapd
sudo snmptrapd -f -Lo
If the first command gives an error such as System has not been booted with systemd, no
service is running and you can ignore it. Port 162 requires sudo. To receive notifications in
WSL, first apply the WSL setting in chapter 0.
6.5 Authenticated v3 Informs
For a v3 Inform, unlike a Trap, the receiver is the authoritative engine. To send v3
Informs with authentication (AUTHNOPRIV · AUTHPRIV), keys computed with each receiver's
engine ID must be registered with AT+TARGETKEY. The module does not store passwords, so it
cannot compute these keys itself.
How to compute and register the keys is described in inform_keys.md (Korean). Without keys,
no notification is sent and the result is ERROR:ACCESS_DENIED.
If this is too much effort, use v3 Traps (no keys needed) or v2c Informs.
6.6 When sending fails
A failure is reported with ERROR:<code> and +NOTIFYFAIL:<receiver>,<reason>. The causes for
each code are in
AT Command Guide chapter 8
and chapter 12.
A Trap is not acknowledged, so OK from the module does not mean it reached the manager.
Check the manager's log to confirm delivery.
7. Troubleshooting
If the module does not communicate at all, the manager shows Unknown user name, or settings
disappear after a reboot, see
Troubleshooting in the Getting Started Guide first.
The table below covers problems that can occur while following this guide.
| Symptom | What to check |
|---|---|
Authentication failure on v3 requests | The password or algorithm (SHA-1 / SHA-256) differs from the manager's. The USM line of AT+DIAG? counts the failures |
Timeout on v1 · v2c requests | The version is off (AT+SNMPVER?) or the community is wrong (AT+COMM?). The module does not answer such requests |
noCreation on a SET | No object exists at that OID. Check objects and OIDs with AT+OBJ?, and create it with AT+OBJADD if missing |
noAccess · notWritable on a SET | The object is RO, or the user's or community's role is MONITOR or NOTIFICATION |
wrongValue on a SET | The value is outside the object's allowed range (the CSV's min_value · max_value, or RANGE in AT+OBJATTR) |
| A SET fails after 750 ms | The object is CONFIRMED and the host did not send AT+SETACK |
CSV shows not applied | Fix the lines named by Row and Column in the result. Nothing is applied while any error remains |
| Traps do not arrive | Check address, port and version with AT+TARGET?, and on the manager the firewall (UDP 162) and snmptrapd.conf |
Related documents
| Document | Contents |
|---|---|
| Getting Started Guide | Wiring, IP setup, first SNMPv3 read, turning on the web interface |
| AT Command Guide | Every AT command |
inform_keys.md (Korean) | Computing and registering receiver keys for authenticated v3 Informs |
| Firmware Update Guide | Firmware update |