EOE-W55RP20 SNMP Module Firmware Update Guide
Firmware 1.2.0
This guide explains how to replace the firmware of a running module with a new version. There are two ways to do it, and both give the same result.
| Method | Use it when |
|---|---|
| Method 1: Web interface | The module is on the network and the web interface is available |
| Method 2: AT commands (UART) | The network is not available, or you update through the host MCU's AT port |
Both methods first check the file and store it in a spare area, and install it at a
reboot. If a transfer fails or is cut off, the firmware that is running now stays as it
is. With the web interface the module reboots by itself a few seconds later; with AT
commands the host chooses the moment with AT+OTAREBOOT.
Update file
Use only the .fwpkg file for an update.
| File | Purpose |
|---|---|
w55rp20_app_1.2.0.fwpkg | Firmware update. This is the file used in this guide |
A .fwpkg file carries the product ID, the version and a CRC. The module checks these and
refuses a file made for another product or a damaged file.
Before you start
-
Note the current version. The first field is the firmware version.
AT+VERSION?
+VERSION:"1.1.0","EOE-ioNIC_SNMP","EOE-ioNIC_SNMP-0008DC360034",0x454F4501 -
Network settings, SNMPv3 users, communities, objects and stored values are all kept through the update.
-
The OID mapping CSV file uploaded through the web interface is erased when an update starts. The mapping in use stays as it is, but
AT+OIDMAPRELOADno longer has a file to apply. If you manage the mapping with a CSV file, upload it again after the update. -
Installation happens at reboot. Do not turn the power off while it is installing.
If the power fails during installation. The module starts the installation again from the beginning at the next power-on. The new firmware stays in the spare area until the installation has finished, so a power failure does not leave the device unusable.
Method 1: Web interface
Step 1: Turn on the web interface
If you already use the web interface, go to step 2.
The web interface is off by default, and from the factory there is no web password, so no
one can log in. Turn the web interface on from the AT port and also set a password with
AT+WEBPASS. The password must be at least 8 characters. The web commands are:
AT+WEB=1                 enable the web interface
AT+WEB=0                 disable
AT+WEB=1,600             enable + session timeout of 600 s (1 … 65535)
AT+WEB?                  → +WEB:1,600,SET

AT+WEBUSER="admin"
AT+WEBUSER?              → +WEBUSER:"admin"

AT+WEBPASS="new-password"   8 … 63 bytes
AT+WEBTIMEOUT=600        1 … 65535 s
AT+WEBTIMEOUT?           → +WEBTIMEOUT:600
AT+SAVE
Step 2: Log in
In a browser, open port 50003 at the module's address.
http://192.168.11.2:50003/
192.168.11.2 is the factory default address. If you changed it, use the address that
AT+IP? reports. Enter the account name (factory default admin) in User and the password
from step 1 in Password, then click Sign in.
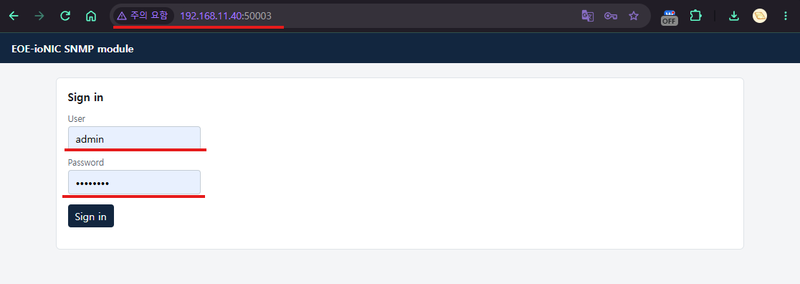
The port is 50003, not 80. If you enter only the address, the browser goes to port 80, gets no response, and the web interface looks as if it were off.
Step 3: Upload the file
-
Click the
Firmwaretab at the top.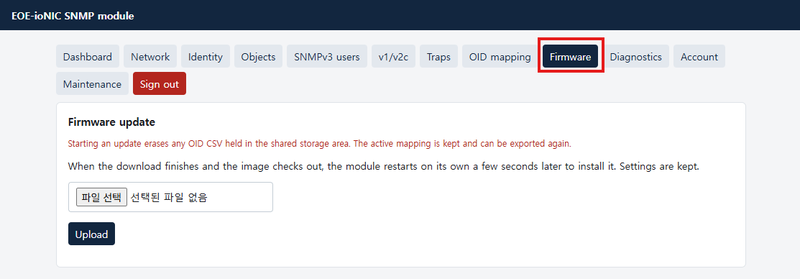
-
Click the file selection button and choose
w55rp20_app_1.2.0.fwpkg.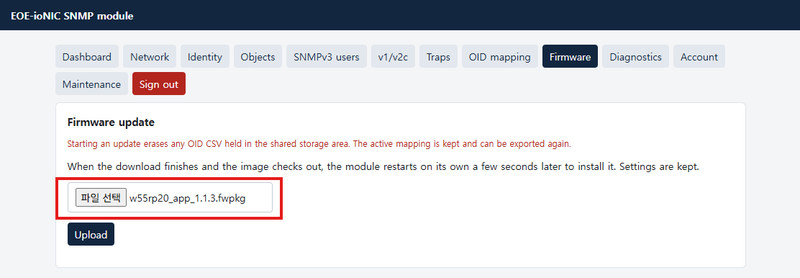
-
Click
Upload. -
A confirmation prompt appears. Check the file name and click OK to start the upload. Cancel uploads nothing.
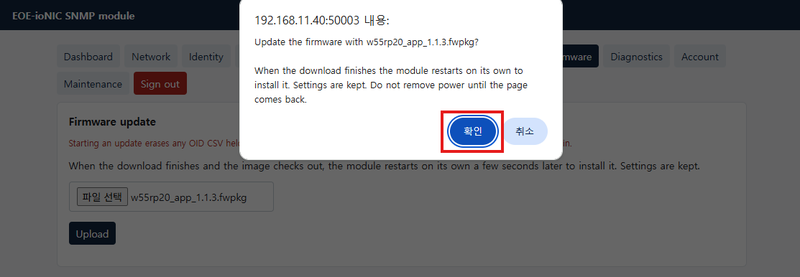
-
While the file is uploading,
Uploading ... do not close this page.is shown. Do not close or reload the page.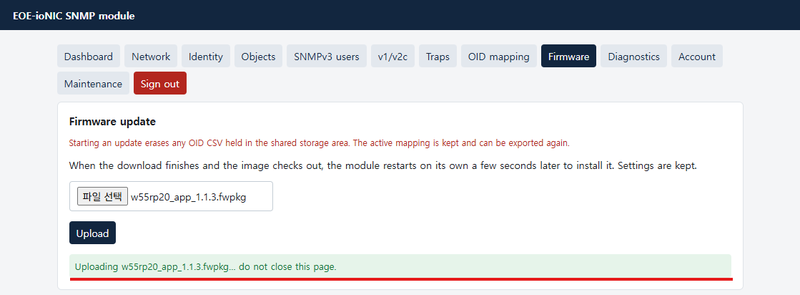
Step 4: Automatic restart and installation
When the file passes its checks, a Download complete box appears in the middle of the
page and counts down to the restart.
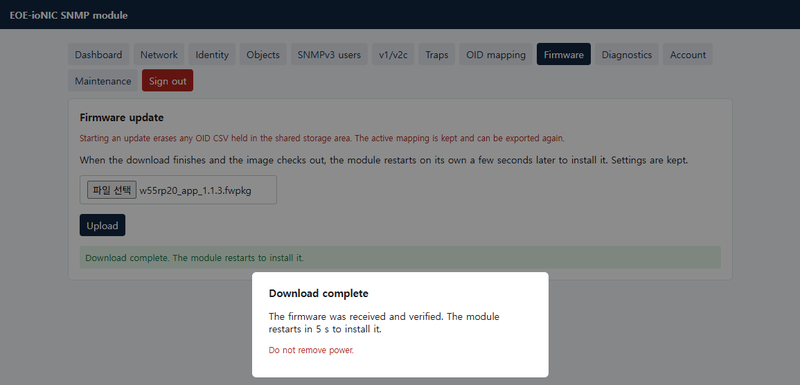
When the countdown ends, the module reboots by itself and installs the new firmware.
There is nothing else to click. The web interface does not respond in the meantime and
the box shows Restarting and installing.... Do not turn the power off while it is
installing.
Step 5: Check
When the module answers again (about 15 seconds), the page reloads by itself and shows the login screen.
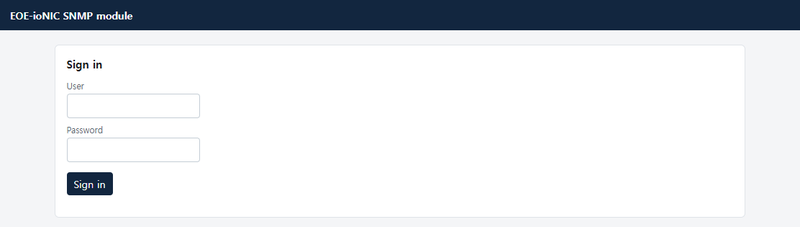
Log in again and check the following on the Dashboard tab.
| Item | Value |
|---|---|
firmware | The new version (for example 1.2.0) |
ota_state | IDLE |
To stop before the restart, send
AT+OTACANCELon the AT port during the countdown. The received file is discarded and the module does not restart.
If the upload is refused
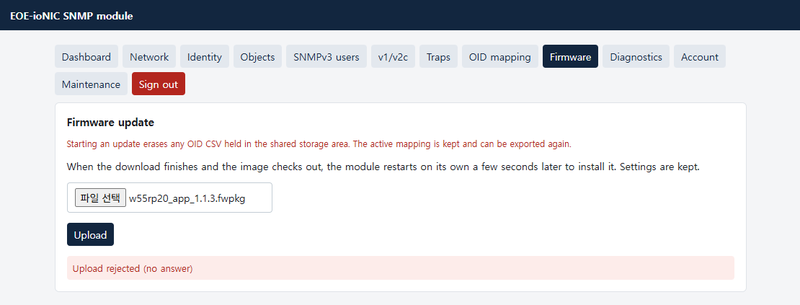
If Upload rejected (<code> <reason>) appears, the file is not installed and the module
does not restart. The firmware that is running now is unchanged, so fix the cause and
start again from step 3.
| Check | Details |
|---|---|
| File type | Make sure it is a .fwpkg file |
| Product | Make sure the file is for this module. A file for another product is refused |
| Damaged file | Download the file again and upload it |
| Other work | The upload is refused while an update is running on the AT port or a CSV file is being uploaded. Try again when it has finished |
(no answer) is shown | The connection to the module was lost during the upload. Reload the page and upload again, or update with method 2 (AT commands) |
Method 2: AT commands (UART)
This section uses the terminal program Tera Term as the example. Menu names are those of the English interface. With another terminal program the steps are the same: use its function that sends a file unchanged (binary transfer).
Step 1: Set up Tera Term
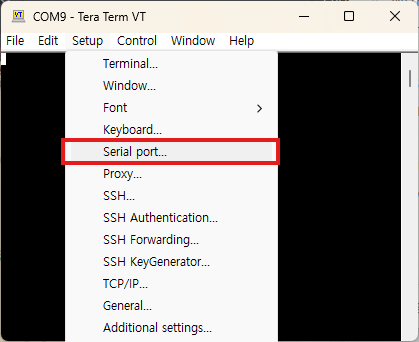
In Setup → Serial port..., match the settings of the module's AT port. The values
below are the factory defaults.
Setup → Serial port... | Serial port setup dialog |
|---|---|
 | 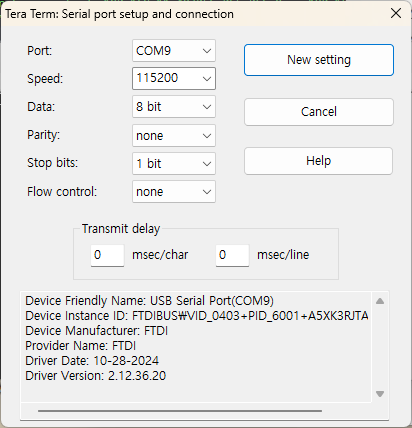 |
| Item | Value |
|---|---|
| Speed | 115200 |
| Data | 8 bit |
| Parity | none |
| Stop bits | 1 bit |
| Flow control | none |
| Transmit delay | 0 msec/char, 0 msec/line |
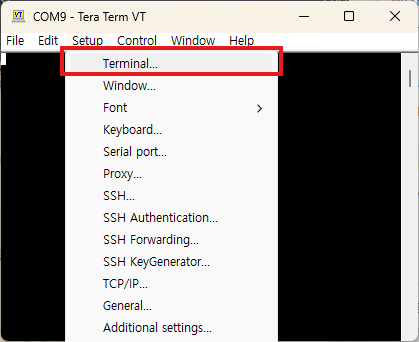
In Setup → Terminal..., set the following.
Setup → Terminal... | Terminal setup dialog |
|---|---|
 | 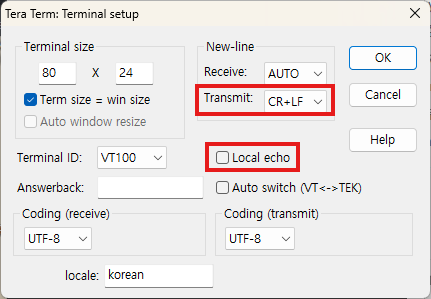 |
| Item | Value | Why |
|---|---|---|
| New-line, Transmit | CR+LF | AT command lines end with CRLF |
| Local echo | Unchecked | If it is on, the contents of the file are printed on the screen while it is sent, and the screen is garbled |
Type AT and check that OK comes back. The module does not echo what you type, so the
commands you type do not appear on the screen; only the responses do.
Some port settings prevent an update. With 7 data bits or
XONXOFFflow control the firmware file cannot be sent intact, so the module does not start the transfer (+OTAFWUP:ERROR,PORT). UseAT+UARTto change to 8 bits and flow controlNONEorRTSCTS, then continue.
Step 2: Start the transfer
Enter the following command. 60 is how long the module waits for data, in seconds.
Any value from 1 to 600 can be used.
AT+OTAFWUP=60
+OTAFWUP:READY

+OTAFWUP:READY means the module is ready to receive the file. Always wait for this
line. Anything sent before it loses its first part.
If nothing arrives for 60 seconds after READY, the module cancels the transfer and
returns to command mode. Start step 3 within that time.
Do not type anything after
READY. From this point every byte that arrives is treated as firmware data. A single Enter changes the first byte of the file, and the transfer is refused.
Step 3: Send the file (binary transfer)
-
Click
File→Send file.... -
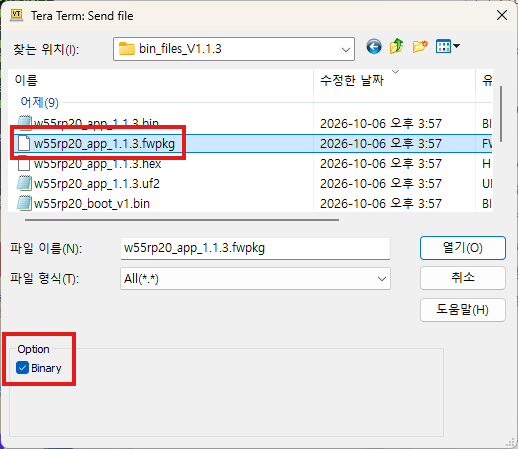
Choose
w55rp20_app_1.2.0.fwpkg. -
Check the
Binaryoption.File→Send file...Choosing the file and checking Binary 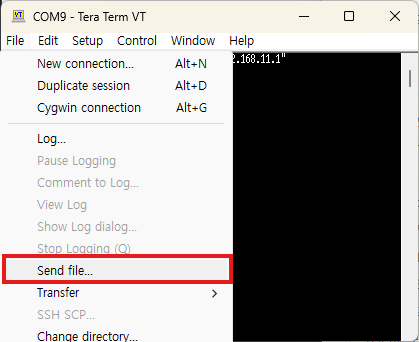
-
Click Open (or OK) to start the transfer.
Always check Binary. Without it, Tera Term sends the file as text, changing the line-break characters (CR, LF) or leaving some bytes out. The file then does not arrive as it was, and the module refuses it with an error such as
IMAGECRCorTIMEOUT.
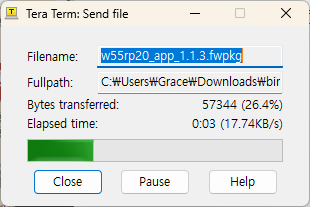
Tera Term shows a progress window during the transfer. Wait until it closes.
Step 4: Check that the transfer completed
When the transfer is finished, the module sends the following.
+OTAFWUP:IMAGE,1.2.0,218980
+OTAFWUP:DONE,218980,1.2.0
OK

| Line | Meaning |
|---|---|
+OTAFWUP:IMAGE,<version>,<size> | The start of the file (the header) passed its checks. Appears early in the transfer |
+OTAFWUP:DONE,<size>,<version> | The whole file arrived, passed its checks and is stored in the spare area |
After DONE and OK the file is ready. It is not installed yet. You can also check the
state with the following command.
AT+OTASTATUS?
+OTASTATUS:READY,218980,218980,100
Step 5: Reboot to install
AT+OTAREBOOT
OK
The module installs the new firmware as it reboots. When the installation has finished and the module has started again, it sends a line with the new version.
+READY:"1.2.0"

Step 6: Check
AT+VERSION?
+VERSION:"1.2.0","EOE-ioNIC_SNMP","EOE-ioNIC_SNMP-0008DC360034",0x454F4501
If the first field shows the new version, the update is complete.
If an error occurs
On an error the module sends +OTAFWUP:ERROR,<reason> and ERROR:<code>, then returns to
command mode. The firmware that is running now is unchanged, so fix the cause and start
again from step 2.
| Reason | Meaning | What to do |
|---|---|---|
MAGIC | Not a firmware package | Make sure you chose the .fwpkg file and did not press a key after READY |
HEADERCRC | The start of the file is damaged | Check that Binary is checked, and download the file again |
PRODUCT | The file is for another product | Make sure the file is for this module |
IMAGECRC | The received contents failed the check | Check that Binary is checked, and download the file again |
NOTAPP | The file is intact but is not firmware this module can run | Make sure it is the correct .fwpkg file |
TIMEOUT,<received>,<total> | The file did not arrive in full | Check that the transfer started within the time set in step 2 and that Binary is checked |
TIMEOUT,<received>,<total>,OVERRUN | The PC sent everything but the module missed part of it | Lower the baud rate or use RTSCTS flow control |
PORT | The transfer cannot run with the current port settings | Check the port settings in step 1 |
BUSY | An update or a CSV upload is running from the web interface | Try again when it has finished |
For other reasons, see chapter 11 of the AT Command Guide.
- If the transfer seems to have stopped, do not press any key; wait. When the time set in
step 2 has passed, the module sends
TIMEOUTand returns to command mode by itself. - A few
ERROR:INVALID_COMMANDlines may follow an error. They are the rest of the file being read as commands. Press Enter once to clear them. - The AT method erases the spare area when the transfer starts. If the transfer fails, an image received earlier is gone as well. The running firmware is not affected.
Good to know
- Once a file has been received (
READY), any reboot installs the new firmware:AT+REBOOT, Reboot on the web interface, or turning the power off and on. - After a web upload the module reboots by itself a few seconds later; after an AT transfer it waits for the host to reboot it.
- To discard a received file without installing it, send
AT+OTACANCELbefore rebooting. - A factory reset is not possible while a received file is waiting. Install or cancel it first.
Related documents
| Document | When to read it |
|---|---|
| AT Command Guide | Chapter 11. Details of AT+OTAFWUP and the other update commands |
| Getting Started Guide | Connecting the module, setting the IP address, turning on the web interface |